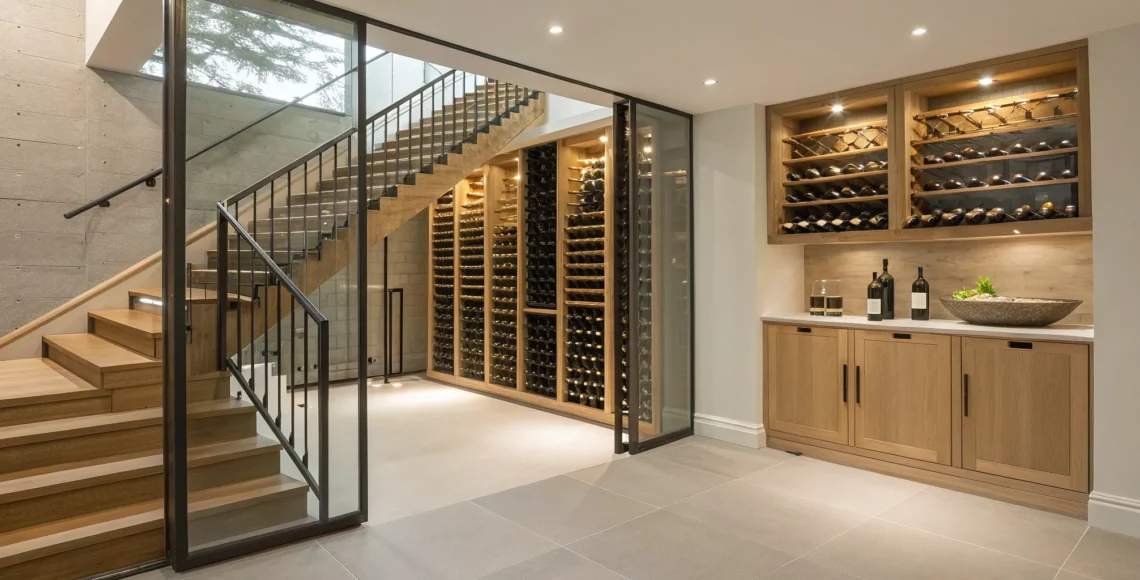
Small Wine Cellar Under Stairs: The Essential Guide
A home should be a reflection of the people who live in it, filled with details that speak to their passions. If you appreciate fine wine, why not make your collection a central feature of your home’s design? That often-ignored space beneath the staircase offers the perfect canvas. A beautifully crafted small wine cellar under stairs can become a stunning focal point, a piece of functional art that sparks conversation and showcases your taste. From sleek glass enclosures to traditional wood-and-stone designs, this custom feature adds a layer of personal luxury that feels completely integrated into your living space, turning a simple nook into a statement.
Key Takeaways
- Prioritize the technical essentials: A functional wine cellar is a sealed, climate-controlled environment. Invest in a dedicated cooling unit, proper insulation, and a vapor barrier to ensure your collection is perfectly preserved.
- Maximize your space with smart design: The unique angles of an under-stair area require a custom approach. Plan a layout with tailored racking that uses every inch efficiently and leaves room for your collection to grow.
- Make it a seamless design feature: Your cellar should be more than just storage; it should enhance your home’s aesthetic. Select materials and a style, whether modern glass or traditional wood, that integrate beautifully with your existing decor.
Why Build a Wine Cellar Under Your Stairs?
That small, often-overlooked space beneath the stairs holds so much potential. Instead of letting it become a forgotten closet for odds and ends, you can transform it into a stunning and functional feature of your home. A custom wine cellar is more than just storage; it’s a statement piece that reflects your taste and a practical solution for protecting your wine collection.
For wine enthusiasts, it’s the perfect way to integrate your passion into your home’s design. For those who love to entertain, it becomes an elegant focal point and a fantastic conversation starter. Building a wine cellar under the stairs is a brilliant way to add a personalized, luxurious touch to your home, turning an awkward nook into a sophisticated showcase. It’s an investment in your lifestyle and in the character of your home, ensuring every square foot is used beautifully and intentionally.
Transform Unused Space
Let’s be honest, the space under the stairs is one of the most underutilized areas in any home. It’s often an awkward shape, making it difficult to furnish or use for conventional storage. This is exactly why it’s the perfect candidate for a custom project. By converting this nook into a wine cellar, you’re not just adding a new feature; you are reclaiming unused square footage and giving it a distinct purpose. This clever use of space adds significant value and functionality to your home without requiring a large-scale renovation or addition. It’s a smart, efficient way to enhance your living area.
Add a Touch of Luxury
A beautifully designed under-stair wine cellar instantly adds a layer of sophistication to your home. Imagine a sleek, glass-enclosed display with subtle lighting that highlights your collection, turning it into a piece of living art. Whether your style is modern, traditional, or something in between, the cellar can be designed to seamlessly blend with your existing decor. These customized designs serve as a stunning visual anchor in a hallway or living area, making a memorable impression on guests. It’s a feature that speaks to a refined lifestyle and an appreciation for the finer things.
Create the Perfect Environment for Your Wine
Beyond its aesthetic appeal, a dedicated wine cellar serves a critical function: protecting your wine. To age properly and maintain its intended flavor profile, wine requires a stable environment with specific temperature and humidity levels. Simply putting a rack under the stairs isn’t enough. A true cellar is insulated, sealed, and equipped with a climate-control system to create the ideal conditions. This ensures your collection, whether it’s a few special bottles or a growing investment, is perfectly preserved. It’s the best way to guarantee every bottle you open will be at its absolute best.
Find the Right Design Style for Your Cellar
Your wine cellar is a personal statement. It should seamlessly blend with your home’s existing character while reflecting your unique style. The space under your stairs offers a fantastic canvas to create a feature that is both functional and beautiful. Whether you lean toward the timeless appeal of a classic European grotto or the clean lines of a contemporary display, the right design will turn this often-overlooked area into a sophisticated focal point. Think of it as an opportunity to add a layer of custom luxury that feels completely integrated with your home’s design story. Let’s explore a few popular styles to get your inspiration flowing.
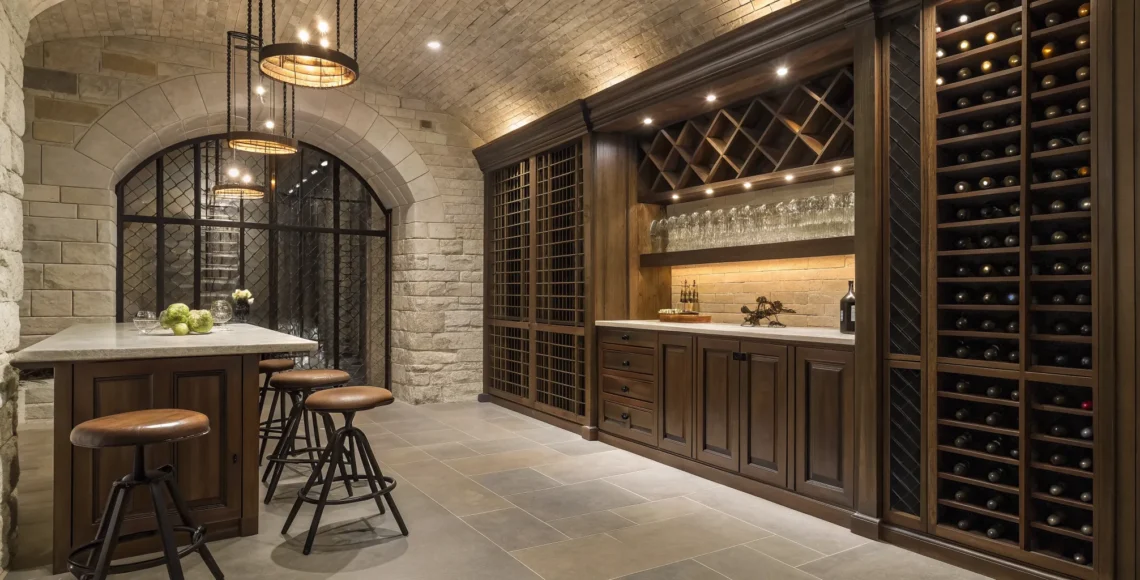
Traditional: Stone and Wood
A traditional design creates a warm, inviting atmosphere reminiscent of a classic European cellar. This style relies on natural materials like stone and rich woods to build a sense of history and character. Imagine walls lined with textured stone paired with custom mahogany or walnut racking. This approach feels both rustic and refined, turning your collection into a cozy retreat. It’s a timeless look that adds substantial warmth and texture to your home, making the space feel like it has always been there. This style is perfect for creating an intimate tasting area, even in a compact space.
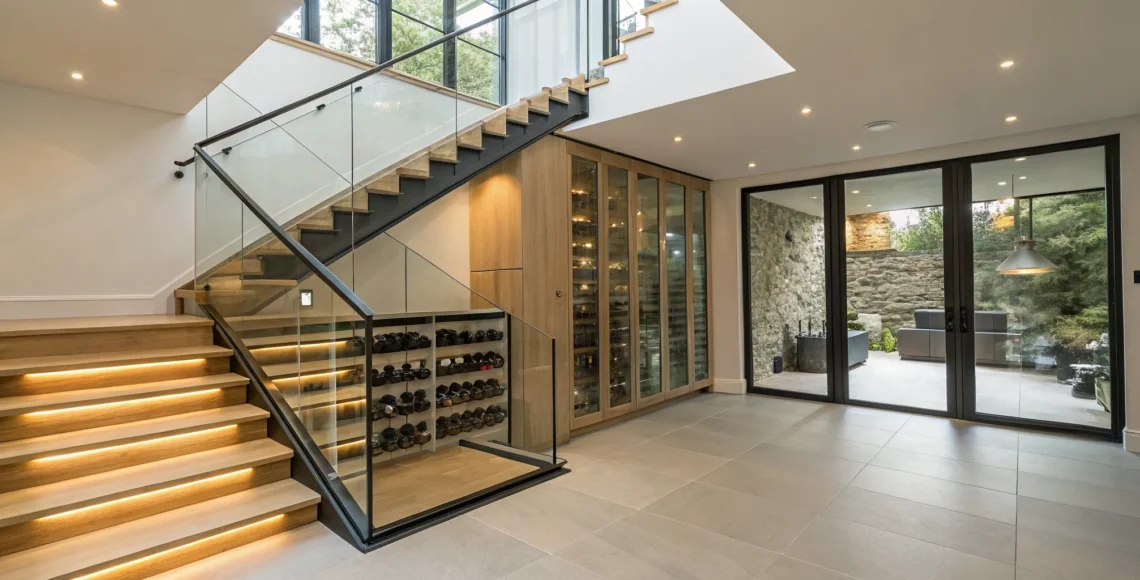
Modern: Glass and Metal
For a sleek, contemporary statement, a modern design using glass and metal is an excellent choice. This style puts your wine collection on full display, treating it like a curated gallery of fine art. Frameless glass walls or doors create a sense of openness and allow the cellar to integrate with the surrounding room without visual interruption. Accents of steel or wrought iron add a sharp, industrial edge that feels clean and sophisticated. This minimalist approach is ideal for showcasing prized bottles and complements a modern home aesthetic beautifully.
The Wine Wall: A Statement Piece
If your under-stair area is more shallow, a wine wall is a brilliant solution that maximizes vertical space. This design turns your collection into a stunning visual feature by mounting racks directly onto the wall. Often enclosed by a glass door, a wine wall acts as a piece of functional art, drawing the eye and starting conversations. It’s a space-efficient option that doesn’t sacrifice style. You can customize the back panel with unique lighting, tile, or wood to create a dramatic backdrop that highlights every bottle and transforms a simple wall into a dynamic focal point.
The Room Divider: Functional and Chic
In homes with open floor plans or floating staircases, a wine cellar can serve as an innovative and elegant room divider. This design uses a glass-enclosed cellar to create a subtle partition between two spaces, like a dining room and a living area. It defines the zones without closing them off, maintaining an open and airy feel. This approach is both practical and visually striking, offering storage while enhancing the architectural flow of your home. It’s a clever way to integrate your collection into your daily life, making it a central feature of your home’s design.
Get the Wine Storage Essentials Right
A truly luxurious wine cellar is more than just beautiful shelving; it’s a precisely controlled environment designed to protect and preserve your collection. Getting the technical details right from the start is the key to creating a space that is both functional and breathtaking. These foundational elements work behind the scenes to ensure every bottle matures perfectly, so you can focus on enjoying your wine.
Control the Temperature
The primary job of your wine cellar is to protect your collection, and that starts with temperature. Wine is sensitive, and its complex flavors can be spoiled by fluctuations. The goal is to maintain a consistent temperature, ideally around 55°F, to allow for graceful aging. A standard home air conditioner simply isn’t built for this kind of precision. You’ll need a dedicated wine cellar cooling unit that is correctly sized for your under-stair space. Investing in the right system ensures your cellar not only looks incredible but functions perfectly for years, safeguarding every bottle you add to it.
Manage Humidity Levels
Just as critical as temperature is humidity. The ideal range for a wine cellar is between 50% and 70%. If the air becomes too dry, corks can shrink and crack, allowing oxygen to seep in and ruin the wine. This is another reason why regular air conditioners are a poor choice, as they are designed to remove humidity from the air. A proper climate control system is engineered to maintain both temperature and humidity, creating a stable environment for your collection. Getting this right prevents the disappointment of discovering a prized bottle has been spoiled by a dried-out cork.
Insulate and Add a Vapor Barrier
Before you even think about racking or lighting, you need to perfect the enclosure itself. Proper insulation is non-negotiable for creating an airtight seal that keeps the cool air in and the warm air out. This allows your cooling system to work efficiently without being overworked. Paired with insulation, a vapor barrier is absolutely essential. This plastic sheeting is installed on the “warm” side of the insulation to prevent condensation from forming inside your walls. Skipping this crucial step can lead to mold and mildew, which can damage your home’s structure and your wine labels.
Choose Wine-Safe Lighting
Lighting sets the mood in your cellar, but it must also be safe for your wine. Exposure to UV light, even from standard household bulbs, can degrade and age wine prematurely. Heat from lighting can also create temperature instability in your carefully controlled space. That’s why low-heat, UV-free options are the only way to go. LED lighting is the perfect solution, offering beautiful illumination without the risk. You can use LED strip lights to create a soft glow behind your racks or spotlights to highlight specific bottles, ensuring your cellar is both a stunning showcase and a safe haven.
How to Plan the Perfect Layout
A successful under-stair wine cellar is all about smart planning. Before you even think about racking or lighting, you need a solid layout that makes the most of your unique space. This is where meticulous attention to detail pays off, turning a potentially awkward nook into a functional and stunning feature of your home. A great layout considers everything from the slope of the ceiling to the placement of electrical outlets. By thinking through these elements upfront, you create a foundation for a cellar that not only looks beautiful but also perfectly preserves your collection for years to come.
Measure and Assess Your Space
First things first, grab a tape measure. You need to know exactly what you’re working with. Measure the length, width, and height of the under-stair area, paying close attention to the changing ceiling height. Think about how much of this space you can realistically dedicate to wine storage. Will it be purely for your collection, or do you need to leave room for other items? It’s also a good idea to consider any future home projects. Planning ahead ensures your new cellar fits seamlessly into your home’s long-term vision and doesn’t become an obstacle later on. This initial assessment of your space is the blueprint for everything that follows.
Work with Awkward Angles and Ceilings
The defining feature of an under-stair space is its unique geometry, complete with sloped ceilings and tight corners. Instead of seeing these as limitations, view them as opportunities for a truly custom design. The key is to embrace the angles. Custom shelving and racking can be designed to fit perfectly into these tricky spots, maximizing every inch of storage from floor to ceiling. This is where a custom wine cellar design truly shines, transforming an irregular space into a seamless and efficient storage area. A well-designed layout will make the cellar feel like it was always meant to be there.
Address Structural Requirements
Beyond the dimensions, you need to consider the structure itself. To protect your wine, the space must be properly prepared. This means thinking about insulation and creating a vapor barrier to seal it from temperature fluctuations and humidity. These elements are critical for maintaining the stable environment your wine needs to age gracefully. Without them, you risk compromising your entire collection. It’s essential to address these structural needs early in the planning process, as they form the protective shell of your cellar and are much harder to add later. Proper wine cellar insulation is not a step you want to skip.
Integrate Electrical and HVAC
Proper climate control is the heart of any wine cellar. A dedicated cooling system will keep your wine at the ideal temperature and humidity, so you need to plan for its placement and power source from the start. You’ll also need electrical wiring for lighting. Think about where you want outlets and light fixtures to go for both function and ambiance. Integrating these systems into your initial layout prevents common problems like uneven temperatures or inconvenient electrical access. Planning your wine cellar climate control and electrical needs ensures your cellar operates flawlessly and looks polished.
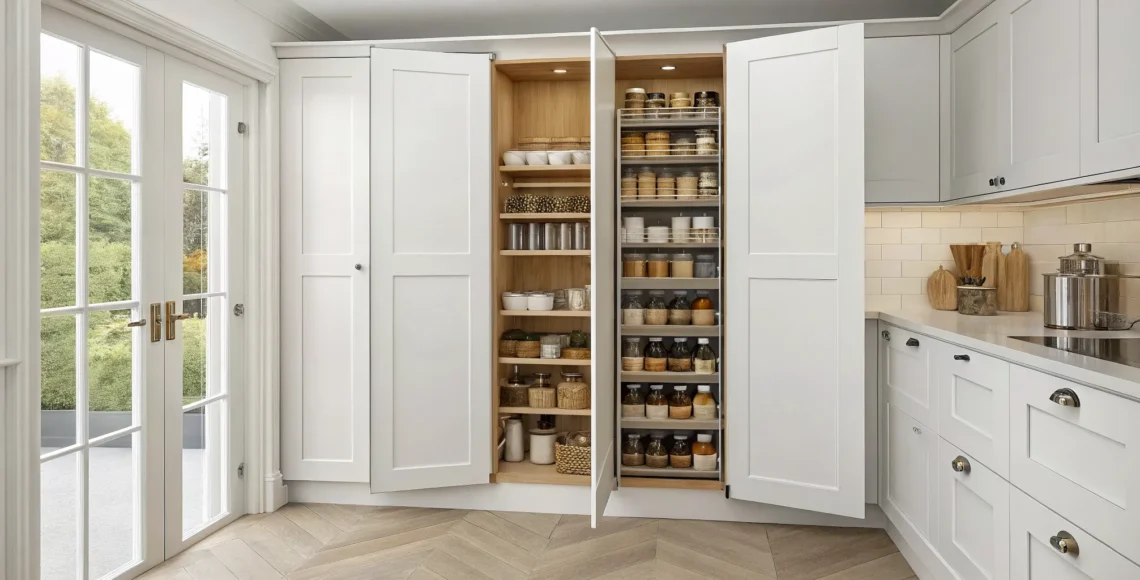
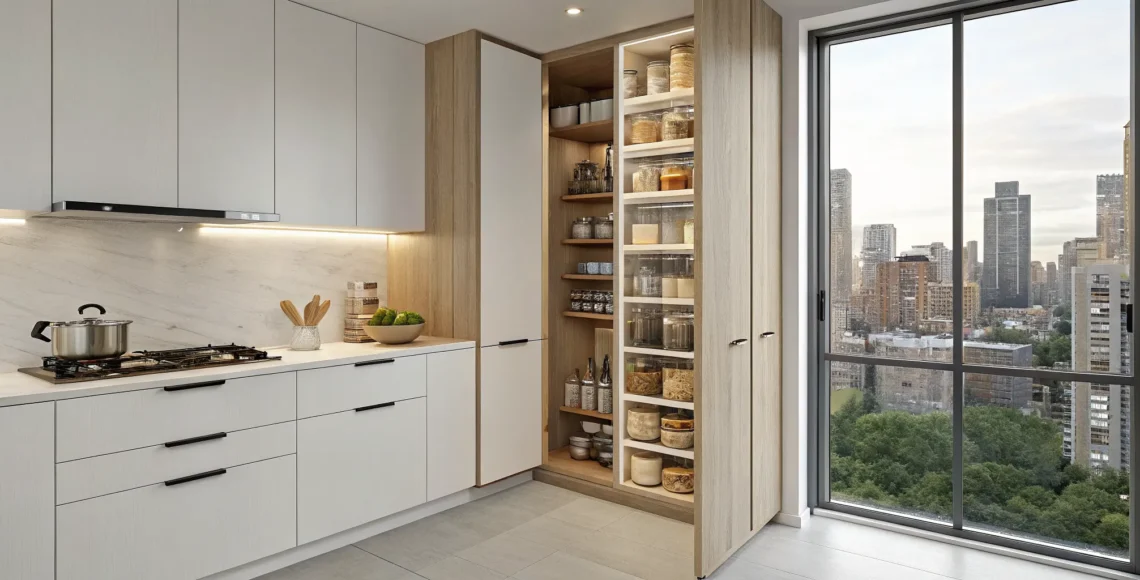
Choose the Best Racking and Storage
The right racking system is the heart of your wine cellar. It’s not just about holding bottles; it’s about showcasing your collection, protecting your investment, and making the most of a unique space. For an under-stairs cellar, where every inch counts, your storage choice defines both the function and the feel of the room. You want a solution that fits the slanted ceilings and awkward corners perfectly while reflecting your personal style.
Whether you prefer a modern, minimalist display or a classic, library-like atmosphere, the racking sets the tone. It’s a major design element that should integrate seamlessly with the rest of your home. Think about how you want to interact with your collection. Do you want to see every label at a glance? Do you need flexibility for different bottle shapes and sizes? Answering these questions will help you find a system that is as practical as it is beautiful. From sleek wall-mounted units to fully custom creations, let’s look at the best options for your under-stairs cellar.
Go Vertical with Wall-Mounted Racks
When you’re working with limited floor space, the best direction to go is up. Wall-mounted racks are a brilliant way to use the vertical height of your under-stairs area. This approach keeps the floor clear, making the space feel larger and less cluttered. More than just a space-saver, wall-mounted systems turn your wine into a stunning visual feature. You can create an aesthetically pleasing display that presents your bottles like works of art. This is an especially great choice if you have a glass-enclosed cellar, as it allows for an unobstructed view of your collection from the outside.
Stay Flexible with Modular Systems
If you know your wine collection is going to grow, a modular system offers incredible versatility. These systems are like building blocks for your cellar. You can start with a few units and add more as you acquire new bottles. This flexibility is perfect for the unconventional shape of an under-stairs space, as you can arrange the components to fit around slopes and angles. Modular wine storage can be reconfigured whenever you like, giving you the freedom to adapt the layout to your changing needs without starting from scratch. It’s a smart, adaptable solution for the evolving collector.
Opt for Custom Built-Ins
For a truly seamless and luxurious finish, nothing compares to custom built-ins. This is where you can transform an ordinary space into an extraordinary feature of your home. Tailored solutions are designed to fit the exact dimensions of your under-stairs area, ensuring no space is wasted. We can work with you to design racking that accommodates your specific collection, integrates lighting perfectly, and matches your home’s aesthetic down to the last detail. Customization allows you to create a wine cellar that is uniquely yours, blending flawless function with sophisticated design for a truly high-end result.
Consider Stackable and Adjustable Racks
Practicality is key in any well-designed space. Stackable and adjustable racks provide the flexibility needed to store a diverse wine collection. Not all wine bottles are the same size; Champagne and Pinot Noir bottles, for example, are often wider than standard Bordeaux bottles. Adjustable racks allow you to customize the spacing to fit various shapes comfortably. This adaptability also ensures there is proper air circulation around each bottle, which is essential for maintaining a consistent temperature and preserving the quality of your wine. It’s a thoughtful detail that makes a big difference in the long-term health of your collection.
How to Organize Your Wine Collection
Once your under-stair cellar is built, the real fun begins: filling it with your favorite wines. But a stunning design can quickly become cluttered without a smart organizational strategy. The goal is to create a system that lets you find the exact bottle you’re looking for, whether you’re grabbing a weeknight Chardonnay or a special occasion Cabernet. A well-organized collection not only looks impressive but also makes managing your wine simple and enjoyable. It protects your investment by ensuring older bottles are enjoyed at their peak and newer ones are allowed to mature properly. By thinking through your organization from the start, you can create a functional and beautiful home for your wine that works for you.
Sort by Type, Region, or Vintage
The first step to an orderly cellar is deciding on a sorting method that fits how you think about wine. There’s no single right way, so choose what feels most intuitive to you. You could group your bottles by varietal, keeping all the Pinot Noirs in one section and the Sauvignon Blancs in another. Another popular approach is to organize by region, which is perfect if you have a passion for wines from Bordeaux or Tuscany. For serious collectors, sorting by vintage is essential for tracking which bottles are reaching their ideal drinking window. Whichever method you choose, consistency is key to making your cellar easy to use.
Create Different Temperature Zones
Different wines have different needs. While a general temperature of 55°F is a good baseline, you can refine your storage by creating subtle temperature zones within your cellar. Since cool air sinks, the lower racks will naturally be slightly colder, making them the perfect spot for sparkling wines and crisp whites. Red wines, which prefer a slightly warmer environment, can be stored on the middle and upper racks. A dual-zone cooling unit can also create distinct climates, giving you precise control. This thoughtful approach ensures every bottle is stored in its optimal conditions, preserving its flavor and character for years to come.
Set Up a Labeling and Inventory System
A great inventory system is your best friend for managing your collection. It prevents you from forgetting about hidden gems and helps you know when it’s time to restock. You can go classic with elegant, reusable bottle tags that display the wine’s name, vintage, and ideal drinking window. For a more modern approach, a dedicated wine inventory app lets you scan labels and track your collection from your phone. Even a simple, well-organized spreadsheet can do the trick. The goal is to create a clear record of what you have and where it’s located, making it effortless to pull the perfect bottle for any occasion.
Plan for a Growing Collection
It’s a tale as old as time: a wine collection rarely stays the same size. What starts as a few dozen bottles can quickly grow into a hundred or more. When designing your under-stair cellar, it’s wise to plan for the future. A good rule of thumb is to build about 25% more storage than you think you currently need. This foresight saves you from having to reconfigure your space down the road. Working with a designer can help you maximize your layout, incorporating modular or custom racking that can easily expand as your passion for collecting wine grows.
Avoid These Common Design Mistakes
Creating a wine cellar under your stairs is an exciting project, but it’s also a highly technical one. It’s easy to get swept up in the aesthetics, envisioning beautiful racking and ambient lighting, but the success of your cellar hinges on getting the fundamentals right. This space is more than just a closet for bottles; it’s a specialized environment designed to protect a valuable and delicate collection. A few small missteps in the design or construction phase can lead to big problems down the road, from spoiled wine to structural issues like mold and mildew. Getting it right from the start is key to creating a space that is not only beautiful but also perfectly functional for years to come.
Let’s walk through some of the most common design mistakes we see so you can sidestep them entirely. Thinking about these details ahead of time will ensure your investment is protected and your under-stair cellar becomes the stunning feature you envision. From climate control and insulation to lighting and layout, every element plays a crucial role in the health of your wine. By understanding and avoiding these potential pitfalls, you’ll be well on your way to building a cellar that works flawlessly and lets you enjoy your collection without worry.
Forgetting Proper Climate Control
One of the most critical errors is treating a wine cellar like any other room in your house. A standard air conditioner is not designed to maintain the consistent temperature and humidity wine needs. These systems often create an environment that is too dry, which can cause corks to shrink and let air spoil the wine. The solution is to use a cooling system designed specifically for wine cellars. These units are built to hold a steady temperature and maintain the ideal humidity level, ensuring your collection ages gracefully. Make sure the unit is properly sized for your space, accounting for insulation and any glass features.
Skimping on Insulation
A wine cellar should be a completely sealed, self-contained environment. Inadequate insulation or a missing vapor barrier will allow outside air to seep in, forcing your cooling unit to work overtime and creating condensation. This moisture can lead to mold and mildew, which can damage your labels, racking, and even the structure of your home. To prevent this, your cellar needs to be fully insulated with a high-quality material like closed-cell spray foam. A continuous vapor barrier should also be installed on the “warm” side of the insulation to keep moisture out. Every joint, crack, and opening must be perfectly sealed.
Using the Wrong Lighting
While you want to showcase your collection, the wrong lighting can be incredibly damaging to wine. Any light that emits UV rays, including natural sunlight, can degrade and prematurely age your wine. Likewise, bulbs that produce a lot of heat, like incandescent or halogen lights, can slowly raise the cellar’s temperature and disrupt the aging process. The best choice is to install LED lighting made for wine cellars. These lights are energy-efficient, produce almost no heat, and are UV-free, making them a safe and stylish way to illuminate your collection without putting it at risk.
Ignoring Accessibility and Flow
It’s easy to design a cellar that perfectly fits the bottles you have right now, but what about the ones you’ll acquire next year? A common mistake is failing to plan for a growing collection. You might find yourself quickly running out of room or struggling to fit different bottle shapes and sizes, like Magnums or Champagne bottles. When planning your layout, think about the future. Incorporate a mix of racking styles to accommodate various bottle types and ensure the design is flexible enough to evolve with your collection. Good flow is also key, so make sure you can easily see and access every bottle without having to move others.
Plan Your Installation and Setup
With your design finalized, it’s time for the installation phase. This is where planning meets craftsmanship to create your beautiful and functional wine cellar. A successful setup depends on a few key decisions, from who will do the work to the final touches that ensure your cellar performs perfectly. Thinking through these steps helps you create a space that protects your wine collection for years to come.
Decide Between Pro and DIY Installation
One of the first decisions is whether to handle the installation yourself or hire a professional. A DIY approach can be rewarding, but technical aspects like installing a vapor barrier and cooling system require precision. If you prefer to leave it to the experts, a professional installer ensures every component is fitted correctly for optimal performance. Many companies offer a free design consultation to help you map out the details, which is a great first step for any project.
Ensure Proper Ventilation
Proper ventilation is critical for your cellar’s health. Without it, you risk issues like condensation, mold, and an overworked cooling unit. The goal is to create a stable environment where your cooling system can operate efficiently without struggling against trapped hot air. A poorly ventilated system can lead to equipment failure and inconsistent temperatures. Getting this right from the start helps you avoid the most common cellar problems and protects your investment.
Select the Right Access Door
Your cellar door is more than an entryway; it’s a critical part of the climate control system. It needs to be exterior-grade with a solid core and excellent weather stripping to create a tight seal. Glass doors are a popular choice for showing off a collection, but make sure they are double-paned and thermally insulated. For safety and a touch of custom flair, consider adding a subtle etching or frosting to a clear glass door. This makes the door more visible while adding a unique design element.
Set a Timeline and Budget
A clear timeline and budget are essential for a smooth project. Be realistic about costs, which include materials, the climate control system, lighting, and labor. It’s always better to invest in a smaller, high-quality cellar than a larger one with subpar components. Remember, your cellar should be designed to grow with your needs, so building a solid foundation is key. When planning your timeline, factor in lead times for any custom elements and build in a buffer for unexpected delays.
How to Maintain Your Under-Stair Wine Cellar
Your under-stair wine cellar is more than just storage; it’s a feature that protects your valuable collection and adds a unique touch to your home. To ensure it continues to function beautifully for years to come, a little regular maintenance goes a long way. Think of it as protecting your investment. By staying on top of a few key tasks, you can prevent common issues and keep your wine in perfect condition, ready for your next special occasion. A well-designed cellar should look great and work perfectly, and consistent care is the key to making that happen.
Establish a Maintenance Routine
A consistent routine is the secret to a healthy wine cellar. You don’t need to spend hours on it; just a few minutes each month can make a huge difference. Create a simple checklist: check the temperature and humidity readings weekly, inspect the door seal for a tight fit, and listen for any unusual sounds from your cooling unit. A quick visual scan for leaks or condensation can also help you catch problems early. This proactive approach ensures your cellar remains a stable, protective environment for your collection to mature gracefully.
Care for Your Cooling Equipment
Your cellar’s cooling unit is its heart, and it needs specific care. Unlike a standard air conditioner, a wine cellar cooling system is designed to maintain both consistent temperature and humidity. Using the wrong type of unit can lead to dry air, which ruins corks and spoils your wine. Check the manufacturer’s guidelines for how often to clean or replace the filter and schedule an annual professional service. This ensures the equipment runs efficiently, preventing the temperature fluctuations that are a wine collection’s worst enemy.
Keep Your Cellar Clean
A clean cellar is a healthy cellar. Regular, gentle cleaning prevents dust from settling on your bottles and allows you to spot potential issues before they become serious. Once a month, lightly dust the racks and bottles with a soft cloth. Keep the floor clear of debris to maintain good airflow and discourage pests. This is also the perfect opportunity to do a quick inventory and make sure your organization system is working for you. A tidy space not only looks better but also helps you protect your wine from contaminants and damage.
Related Articles
- 7 Steps to the Perfect Cellar Design for Home
- 15 Small Wine Cellar Design Ideas for Any Space
- Cellar Design for Home: A Step-by-Step Guide
Frequently Asked Questions
Do I really need a specialized cooling unit, or is a regular air conditioner enough? A dedicated wine cellar cooling unit is absolutely essential. Standard air conditioners are designed to cool a room and remove humidity, which is the exact opposite of what your wine needs. That dry air can cause corks to shrink, letting oxygen seep in and spoil your collection. A proper wine cooling system maintains both a consistent temperature (around 55°F) and the ideal humidity level (between 50-70%), creating the stable environment your wine needs to age perfectly.
My under-stair space seems too small or oddly shaped. Can it still be converted into a functional cellar? Yes, almost any under-stair space can be transformed with the right approach. In fact, those awkward angles and sloped ceilings are perfect opportunities for a truly custom design. Instead of trying to fit pre-made racks into a unique space, a custom solution is built to the exact dimensions of your nook. This ensures every inch is used efficiently for storage while creating a seamless, integrated look that feels like it was always meant to be there.
How long does a project like this typically take from design to completion? The timeline can vary quite a bit depending on the complexity of your design and the lead time for custom elements like racking or glass doors. Generally, you can expect the process to take several weeks. This includes the initial design and planning phase, preparing the space with proper insulation and a vapor barrier, and finally, the installation of the racking, cooling system, and lighting. A clear plan from the start helps keep everything moving smoothly.
Is a custom wine cellar a good investment for my home’s value? A well-designed wine cellar is a luxury feature that adds significant character and appeal to a home. Much like a gourmet kitchen or a spa-like bathroom, it’s a sophisticated upgrade that speaks to a refined lifestyle. While it may not have a direct dollar-for-dollar return like adding a bedroom, it can be a powerful differentiator that makes your home more memorable and attractive to discerning buyers who appreciate custom, high-end details.
I’m not a huge collector yet. Is it still worth building a dedicated cellar? Definitely. Building a cellar is about creating the perfect environment from the start, whether you have twenty bottles or two hundred. It allows you to buy wines you want to age and know they are being stored correctly. We often recommend planning for about 25% more space than you think you need. This gives you a beautiful, functional feature that you can enjoy now and that has the capacity to grow with your collection over time.