The Ultimate Guide to Henderson Interior Design
It’s the ultimate design challenge: creating a home that is both stunningly beautiful and genuinely comfortable. So often, high-design spaces can feel more like museums than places to actually live. This is where the genius of Shawn Henderson’s work truly shines. He has perfected the art of crafting interiors that are impeccably designed yet remain warm and inviting. His secret lies in a client-centered process that prioritizes your story and lifestyle above all else. The work of bespoke interior designer Henderson proves you don’t have to choose between sophistication and comfort; you can have a space that is both a work of art and a perfect sanctuary for everyday life.
Key Takeaways
- Let your story lead the design: A truly personal home is a reflection of your life. Focus on curating meaningful art and objects that tell your story, creating a space that feels authentic instead of just trendy.
- Create calm with a touch of drama: Use a foundation of serene, neutral colors to create a tranquil space. Then, strategically add personality and depth with rich textures, bold art, or a single statement piece of furniture.
- Invest in quality, not trends: Focus on acquiring well-crafted, timeless pieces that you truly love. This approach builds a more sustainable and meaningful home, as quality craftsmanship endures long after fleeting trends have faded.
Hiring an Interior Designer: What to Expect
Bringing a professional designer into your home is about more than just picking out furniture; it’s a partnership. The goal is to collaborate with an expert who can translate your vision into a functional, beautiful reality. A great designer acts as your creative partner and project manager, saving you time and stress by handling all the complex details, from sourcing materials to coordinating with contractors. They bring a wealth of knowledge, industry connections, and a trained eye that can help you avoid costly mistakes and see possibilities you might have missed. At its best, the process is a creative dialogue that results in a space that is uniquely yours, but refined with professional polish. It’s about finding someone who understands your lifestyle and can build a design around it.
The Pros and Cons of Working with a Professional
Deciding to hire a designer is a big step, and it’s smart to weigh the benefits against the potential drawbacks. On the plus side, you gain access to expert knowledge and creative solutions you wouldn’t have thought of on your own. Designers save you an incredible amount of time by managing the entire project and have access to trade-only sources and discounts. A professionally designed home can also significantly increase its resale value. However, the cost is a major consideration. You also might worry about feeling disconnected from the creative process or that the final result won’t feel like *you*. The key is to find a firm with a client-centered approach, ensuring your voice is heard every step of the way and that the design truly reflects your personality and story.
Tips for a Smart and Savvy Design Budget
A successful design project starts with a clear and realistic budget. Before you begin, be upfront with your designer about what you’re comfortable spending. This transparency prevents scope creep and ensures everyone is on the same page. A great strategy is to prioritize the most important elements first—like foundational furniture or architectural changes—and then layer in luxury items if your budget allows. Don’t be afraid to mix high and low; a savvy designer knows where to invest and where to save. Finally, do your homework. When choosing a designer, compare their pricing models and read reviews to find someone whose fees and process align with your expectations for a fair and collaborative partnership.
Breaking Down Interior Design Costs
Understanding how interior designers structure their fees can feel confusing, but it doesn’t have to be. Getting familiar with the common pricing models will empower you to have confident conversations and make informed decisions for your project. Most designers use one of a few standard methods, each with its own benefits depending on the scope and scale of the work. Whether it’s an hourly rate for consultation or a flat fee for a full-service project, the goal is to find a structure that provides clarity and value. Knowing these details helps you and your designer establish a transparent financial framework from the very beginning, ensuring there are no surprises along the way and you can focus on the creative journey.
Common Pricing Models Explained
Designers typically charge for their services in one of four ways. Some may offer a combination, but understanding the basics will help you anticipate costs. The most common structures are hourly rates, flat fees, cost per square foot, and a percentage of the total project cost. Each model is suited for different types of projects. For instance, an hourly rate might be perfect if you just need a few hours of professional advice, while a flat fee is often better for a large-scale renovation where the scope is clearly defined from the start. Let’s look at what each of these means for your budget.
Hourly Rates
Charging by the hour is a common practice, especially for smaller projects or design consultations. Rates can vary widely based on the designer’s experience and location, typically ranging from $50 to over $500 per hour. This model is flexible and works well when the scope of work isn’t fully defined. You pay for the exact amount of time the designer spends on your project, whether it’s creating floor plans, sourcing furniture, or managing installations. To avoid unexpected costs, it’s a good idea to ask for an estimated number of hours upfront.
Flat-Fee Projects
For projects with a clear and well-defined scope, many designers offer a flat fee. This single price covers all the design work outlined in your contract, from initial concept to final reveal. A flat fee can range from a few thousand dollars for a single room to tens of thousands for a full-home renovation. The biggest advantage of this model is its predictability; you know the total design cost from the outset. This approach is ideal for clients who want budget certainty and is often used by full-service firms for comprehensive projects.
Cost Per Square Foot
Some designers calculate their fees based on the size of your space, charging a set rate per square foot. This model is straightforward and often used for new construction or large-scale remodels where measurements are easily defined. Rates typically fall between $5 and $17 per square foot, but this can change depending on the project’s complexity and the designer’s expertise. It’s a simple way to estimate costs for the design service portion of your budget, especially when you’re in the early planning stages of a major project.
Percentage-Based Fees
In this model, the designer’s fee is a percentage of the total project cost, including furniture, materials, and contractor services. This markup usually ranges from 10% to 45%. This structure is common for large projects where the designer is responsible for purchasing all goods and managing the entire budget. It incentivizes the designer to manage the project efficiently, as their fee is tied to the overall cost. This works best when there is a strong foundation of trust between you and your designer.
How Finish Levels Impact Your Budget
The materials and finishes you choose have one of the biggest impacts on your total budget. A basic finish level, using standard, readily available items, is the most cost-effective. A mid-range finish mixes standard pieces with some custom elements and higher-quality materials for a more personalized look. For a truly luxurious and bespoke space, a high-end finish is the way to go. This involves premium materials, custom-made furniture, and intricate, detailed craftsmanship. While it costs more—often over $17 per square foot—investing in high-end finishes means you are paying for superior quality, durability, and a design that is tailored specifically to you, which is the hallmark of a truly custom home.
Exploring Online Design Services
For those with smaller projects or more limited budgets, online design services have become a popular alternative. Platforms like Havenly or Decorilla offer room design packages starting at around $99 to $549 per room. These services are convenient and provide an accessible entry point to professional design advice. You typically fill out a questionnaire, upload photos of your space, and collaborate with a designer remotely to receive a concept board and shopping list. While it lacks the hands-on, personalized touch of a full-service firm, it can be a great option for getting a quick refresh or tackling a single room on your own time.
Who is Shawn Henderson?
If you follow the world of high-end interior design, you’ve likely come across the name Shawn Henderson. He’s a New York-based designer celebrated for creating spaces that feel both sophisticated and deeply personal. What makes his work so compelling is his commitment to a client-centered process, where the homeowner’s story is the true foundation of the design. He doesn’t just decorate a room; he curates an environment that is a direct reflection of the people who live there. His approach is less about imposing a signature style and more about drawing out his client’s unique vision to create something truly one-of-a-kind. This focus on collaboration and bespoke detail has made him a leading voice in the industry.
His Rise in the World of Interior Design
Every great designer has an origin story, and Henderson’s is refreshingly down-to-earth. His passion for design began simply by rearranging furniture in his own home, a pastime that grew into a celebrated career. Today, he runs a successful design studio in Manhattan, where he and his team bring their thoughtful design approach to life. His journey from a curious homeowner to an industry leader is a testament to his innate talent and dedication. This hands-on beginning seems to inform his work still, which always feels grounded and livable, no matter how luxurious the final result is.
What Is Shawn Henderson’s Design Philosophy?
Henderson’s design philosophy is built on a foundation of collaboration. He believes that the most successful interiors are born from a true partnership between designer and client. His process often begins by discussing a client’s personal tastes, especially their connection to art, and using that as a starting point to plan the space. According to a Phaidon interview, this ensures every project is tailored to the individual’s lifestyle. He aims to create environments that feel balanced and calm by expertly mixing colors, textures, and styles. Yet, he isn’t afraid to encourage experimentation with layouts and bold statement pieces to give a room personality and a touch of drama.
Where You’ve Seen His Designs
Over the years, Henderson has become a go-to designer for those who appreciate understated luxury and personalized interiors. He has designed homes for notable figures like actress Glenn Close, NASCAR champion Jimmie Johnson, and actor Will Ferrell, each project reflecting the client’s distinct personality rather than a cookie-cutter aesthetic. His incredible work has earned him features in premier design magazines, including Architectural Digest and Elle Decor. This widespread recognition highlights his ability to consistently create spaces that are not only beautiful and functional but also newsworthy.
Meet Another Henderson: Emily Henderson’s Eclectic Style
While Shawn Henderson masters serene, art-focused interiors, another designer with the same last name has captured the hearts of design lovers with a completely different, yet equally personal, approach. Emily Henderson champions a style that is vibrant, accessible, and full of personality. She rose to fame as a relatable expert who believes that a home should be a direct reflection of the people living in it, quirks and all. Her work is a fantastic lesson in how to mix styles, play with color, and create a space that feels lived-in and loved from day one. She proves that you don’t need a massive budget to have a stylish home, just a clear vision and a willingness to let your personality shine through.
From HGTV Star to Design Author
Many of us first met Emily Henderson when she won Season 5 of HGTV Design Star, which quickly led to her own show, Secrets from a Stylist. On screen, she became known for her bubbly personality and her knack for breaking down design principles in a way that felt easy and fun. Since her television debut, she has built a design empire, including her incredibly popular blog, Style by Emily Henderson, and a successful design business. Her journey from TV host to best-selling author and design mogul has solidified her as a leading voice in creating homes that are both beautiful and functional, without being overly precious.
Her “Perfectly Imperfect” Design Philosophy
At the core of Emily’s work is her “perfectly imperfect” design philosophy. She firmly believes that every room needs something with a bit of history—like an antique or a vintage find—to give it a “soul.” This prevents a space from feeling sterile or looking like a page from a catalog. For Henderson, every object should earn its place by being useful, beautiful, or deeply meaningful. When an item hits all three, she calls it “design magic.” While comfort is her top priority, she never sacrifices style. Instead, she encourages mixing different aesthetics to create an eclectic look that feels unique to the homeowner.
Emily’s Advice for Aspiring Designers
One of the most refreshing things about Emily Henderson is her encouraging advice for anyone interested in design. She urges aspiring designers and home enthusiasts alike to simply start creating and sharing their work, even if it’s just styling a corner of their living room and posting it online. She believes that the more you practice and experiment, the faster you will discover your unique point of view and refine your skills. This hands-on approach is a great reminder that developing your personal style is a process of discovery. It’s about trying things out, seeing what you love, and building a home that tells your story, one piece at a time.
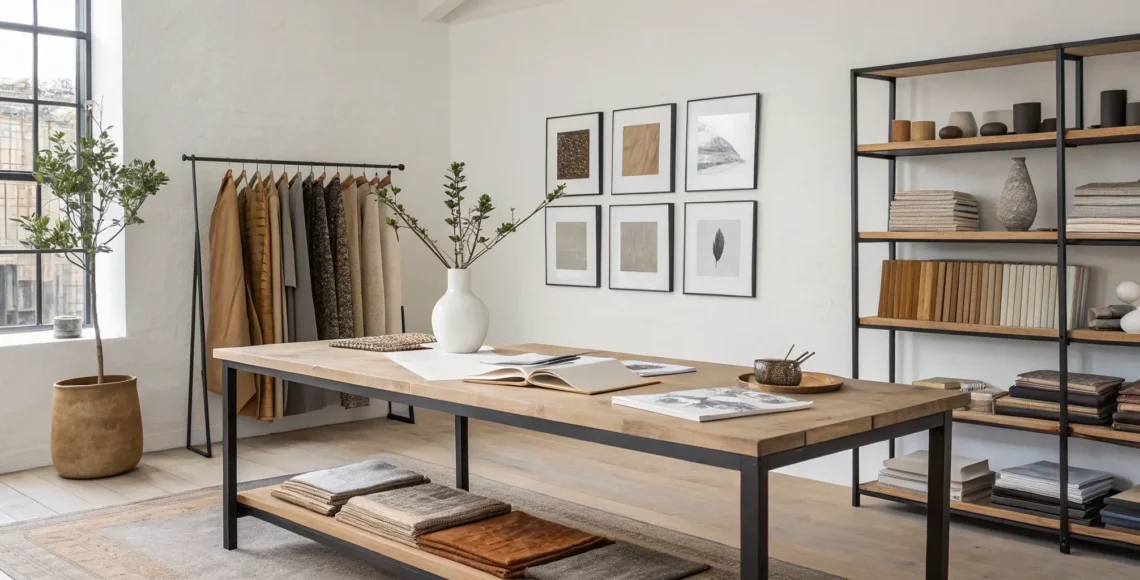
What Defines a Shawn Henderson Interior?
Shawn Henderson’s work is instantly recognizable, not for a repeated formula, but for a feeling. His spaces are serene yet soulful, meticulously curated yet deeply personal. What makes his style so distinct is a commitment to a few core principles that guide every project. It’s less about a specific look and more about an approach that places the client at the center of the creative process. This results in homes that are not just beautiful, but are true reflections of the people who live in them. His design is a masterclass in creating environments that feel both aspirational and completely authentic.
Collaborating to Create Your Perfect Space
At the heart of Henderson’s method is a genuine partnership with his clients. He doesn’t arrive with a rigid vision to impose; instead, he builds the design from the ground up, based on your life and personality. The process begins with conversation, exploring your tastes, especially in art, to understand what moves you. As he explained in an interview with Phaidon, his philosophy is centered on collaboration to ensure every project is tailored to the client’s unique lifestyle. This dialogue-driven approach guarantees that the final space isn’t just a “Shawn Henderson interior” but a home that feels uniquely yours, because you helped create it.
Letting Your Personal Story Shine Through
For Henderson, a home should be a biography of its owner. He believes the objects, art, and furniture within a space should tell a story, reflecting your personal journey and character. This means moving beyond trends to select pieces with history and meaning. It’s about curating a collection over time, where each item holds a memory or sparks a feeling. This storytelling approach is what gives his interiors such incredible depth and soul. The goal is to create a space that feels lived-in and loved, filled with pieces that speak to who you are and where you’ve been.
Designing Custom Furniture and Lighting
You’ll rarely find off-the-shelf solutions in a Henderson-designed home. A key element of his work is the emphasis on custom-designed furniture and lighting. This commitment to bespoke pieces ensures that every element is perfectly scaled and suited to the space. His interiors are celebrated for their meticulous craftsmanship, where every detail, from the joinery on a cabinet to the finish on a light fixture, is thoughtfully considered. This focus on custom work allows for a level of personalization that is impossible to achieve otherwise, resulting in a cohesive and truly one-of-a-kind environment that is both functional and beautiful.
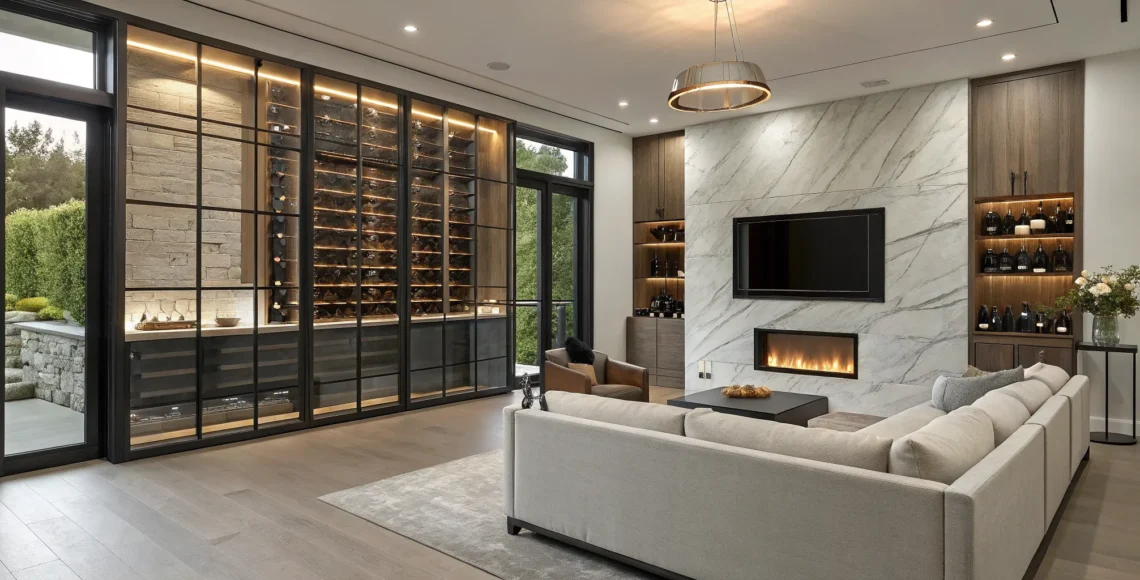
Balancing Sophistication with a Touch of Drama
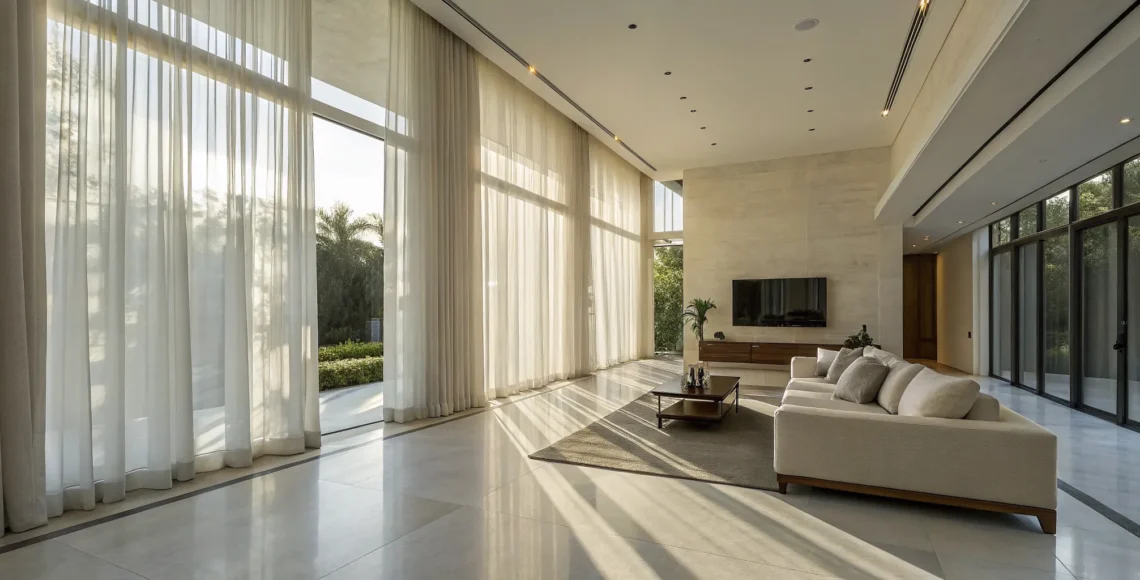
Henderson is a master of creating spaces that are both tranquil and exciting. He often starts with a calm, neutral palette, using soft whites, warm grays, and earthy tones to create a serene backdrop that feels inviting and easy to live in. But his rooms are never boring. He strategically introduces moments of drama through bold art, a sculptural piece of furniture, or a vibrant pop of color. This masterful balance is on full display in his own Manhattan apartment, where minimalism meets powerful, dramatic statements. The result is a sophisticated space that feels both peaceful and dynamic.
How to Get the Shawn Henderson Look
Shawn Henderson’s interiors feel both impeccably designed and deeply personal. It’s a balance that seems effortless, but it’s achieved through a thoughtful and deliberate process. He doesn’t just decorate a room; he composes it. By focusing on a few key principles, he builds spaces that are serene, sophisticated, and full of character. Let’s look at the specific techniques he uses to bring his signature look to life, from layering materials to integrating meaningful art.
Layer Textures to Add Depth and Warmth
A Henderson-designed room invites you to touch and feel. He masterfully layers different textures and materials to create a sense of depth and warmth that a flat, one-note design can’t achieve. Think of a soft wool rug under a smooth leather armchair, with a rough-hewn wooden table nearby and a sleek metal lamp overhead. This mix of materials makes a space feel rich and considered. He often uses custom-made furniture and unique lighting to ensure every element contributes to this layered, sophisticated look, resulting in a balanced and calm environment that still feels dynamic.
Use a Calm Palette with Bold Accents
Henderson is known for his serene and inviting color schemes. He typically starts with a foundation of calm, neutral tones like soft grays, warm whites, and earthy beiges. This creates a tranquil backdrop that allows the room’s architecture and furnishings to shine. But his spaces are never boring. The magic happens when he introduces strategic pops of color and bold statement pieces. A vibrant piece of art, a jewel-toned velvet pillow, or a dramatically shaped chair can add personality and energy without overwhelming the senses. This approach creates interiors that feel both timeless and modern, sophisticated yet livable.
Choose Art That Reflects You
For Henderson, art isn’t an afterthought; it’s a core part of a home’s soul. He believes that the art you live with should be a true reflection of your personality and story. That’s why his process always begins with a conversation, getting to know his clients’ tastes and passions. As he explained in an interview about art in the home, this collaborative approach ensures the final selections feel authentic. By carefully curating pieces that resonate with the homeowner, he transforms a beautifully designed house into a deeply personal sanctuary, making the experience of living there richer and more meaningful.
How to Adapt His Style for Your Home
While his work is high-end, Henderson’s core principles can be adapted to any space because they are rooted in personal storytelling. He believes a home should reflect the client’s unique journey, filled with objects and art that hold meaning. This philosophy is about more than just aesthetics; it’s about creating an environment that supports and inspires you. As seen in his own masterfully designed Manhattan apartment, the goal is to build a space that feels authentic to the people who live there. It’s a reminder that great design isn’t about following trends, but about discovering and expressing your own style.
Core Interior Design Rules to Guide You
While mastering a designer’s intuitive sense of style takes years, there are foundational rules that can help guide your decisions. These aren’t rigid laws but rather time-tested principles that create balance and visual harmony. Think of them as your framework for making confident choices, whether you’re arranging a bookshelf or planning a whole room. By understanding these core concepts, you can start to build a space that feels as thoughtfully composed as a Shawn Henderson interior, ensuring every element works together to create a cohesive and sophisticated home.
The 70/30 Rule for Color and Style
If you’ve ever wondered how designers make a room feel so put-together, the 70/30 rule is often the secret. This guideline is all about creating a balanced, harmonious space by dedicating 70% of the room to a dominant color or style and the remaining 30% to an accent. For example, 70% of your room might feature serene, neutral tones on the walls, sofa, and rug. The other 30% is your chance to add personality with a contrasting color in your pillows, a bold piece of art, or a unique accent chair. This prevents a room from feeling either chaotic or flat, giving it just the right amount of visual interest.
The 3-5-7 Rule for Grouping Decor
When it comes to styling surfaces like coffee tables, consoles, or shelves, grouping items in odd numbers is a simple trick that always works. The 3-5-7 rule suggests arranging decor in clusters of three, five, or seven to create a display that feels dynamic and natural. An even number of items can look static and staged, while an odd number creates a sense of movement that is more pleasing to the eye. Try grouping a tall vase, a short stack of books, and a small decorative object together. This technique helps you curate vignettes that look intentional and collected, not cluttered.
Your Action Plan for a Henderson-Inspired Home
Shawn Henderson’s approach is a masterclass in creating spaces that feel both sophisticated and deeply personal. While his projects are high-end, the core ideas behind his work can be adapted to any home. It’s less about a strict set of rules and more about a mindset focused on intention, quality, and personal expression. Applying his principles means looking at your space as a canvas for your own story, where every object and arrangement contributes to a feeling of calm, comfort, and quiet confidence. This philosophy moves beyond simple decoration and into the realm of true interior design, where a home becomes a sanctuary tailored to its inhabitants.
The goal is to create a home that feels collected and curated over time, not decorated overnight. It’s about finding the right balance between clean, modern lines and the warmth of personal touches that make a space feel lived-in and loved. By focusing on layout, thoughtful details, quality pieces, and your own narrative, you can begin to shape a space that has that signature Henderson feel: understated, elegant, and completely your own. It’s an invitation to slow down, to be more deliberate with your choices, and to consider what truly makes a house feel like a home. This thoughtful process is what transforms a room from a simple space into a personal statement.
Rethink Your Furniture Layout
One of the most effective ways to refresh a room doesn’t cost a thing. Henderson encourages playing with furniture arrangements to discover new possibilities within a space. Don’t feel locked into the first layout you try. Move a sofa off the wall, angle a pair of chairs to create a conversation nook, or swap the placement of a desk and a bookshelf. As Henderson demonstrates in his own Manhattan apartment, the right layout can completely alter a room’s flow and feeling. Use different colors and textures to create a sense of balance and comfort, making the room feel both intentional and inviting.
Focus on Small, Surprising Details
A truly personal home is filled with what Henderson calls “small, happy surprises.” These are the unexpected elements that add character and reveal the personality of the people who live there. Think of a vibrant piece of art tucked away in a hallway, a unique vintage object on a side table, or a bold color painted on the inside of a bookshelf. These details break up the predictability of a space and create moments of delight. It’s not about clutter; it’s about curating a few special items that make you smile and give your home a sense of history and charm.
Opt for Quality Craftsmanship Over Trends
In a world of fast-moving trends, Henderson’s work is a testament to the enduring value of quality. Instead of filling your home with disposable decor, he advocates for investing in pieces with meticulous craftsmanship that are built to last. This means prioritizing well-made furniture, natural materials, and custom finishes. A beautifully crafted wooden table or a hand-upholstered chair will not only stand the test of time but will also bring a deeper sense of substance and permanence to your home. This approach is more sustainable and ultimately results in a space that feels more grounded and authentic.
Design a Home That Tells Your Story
Your home should be a reflection of who you are, where you’ve been, and what you love. Henderson believes that people want to tell a story with the things they own. Before you buy something new, ask yourself if it connects to your personal narrative. Surround yourself with meaningful objects, whether it’s a piece of art from a favorite trip, a family heirloom, or a book collection that speaks to your passions. This collaborative approach ensures your space is more than just a collection of nice things; it’s a living expression of your unique vision and lifestyle.
Why a Bespoke Design Approach is Worth It
Choosing an interior designer is about more than just picking out furniture or selecting a paint color. It’s about crafting a space that truly tells your story. A bespoke design approach, like the one Shawn Henderson champions, moves beyond fleeting trends to create a home that is uniquely and authentically yours. This method is built on a deep partnership between designer and client, resulting in a space that is not only beautiful but also deeply personal and built to last. It’s an investment in your daily life, ensuring your environment supports and inspires you for years to come. This isn’t about creating a showroom; it’s about creating a sanctuary.
When you opt for a bespoke design, you are choosing a path of intention. Every element is considered in the context of your life, your habits, and your aspirations. The process is collaborative and thoughtful, ensuring the final result is a cohesive reflection of your identity. Instead of a home filled with objects, you get a home filled with meaning. This approach prioritizes longevity, both in style and in substance. By focusing on quality craftsmanship and timeless principles, a bespoke interior becomes a lasting legacy, a personal backdrop for all the moments, big and small, that make up your life. It’s the ultimate expression of personal style, translated into a living, breathing space.
The Lasting Value of a Personalized Space
A bespoke design process begins and ends with you. Instead of imposing a pre-set style, this approach is rooted in understanding your personality, lifestyle, and vision. Henderson’s design philosophy centers on collaboration, often starting with conversations about your passions, like your taste in art, to inform the entire plan. This ensures every choice, from the overall layout to the smallest decorative object, feels intentional and meaningful. The result is a home that doesn’t just look like a magazine feature; it feels like a genuine extension of who you are. It’s a space where you are truly seen, understood, and comfortable in your own surroundings.
Investing in Sustainable, High-Quality Pieces
Opting for a bespoke design is a commitment to quality over quantity. It’s about moving away from disposable trends and investing in pieces that will stand the test of time. Henderson’s interiors are recognized for their meticulous craftsmanship, with a sharp focus on custom furnishings, unique finishes, and thoughtful styling. By prioritizing high-quality materials and working with skilled artisans, you create a home filled with items that are not only beautiful but also durable. This approach is inherently sustainable, as it favors longevity and reduces waste. It’s about building a collection of meaningful pieces that will bring you joy for a lifetime, not just for a season.
Create a Home That Can Evolve with You
Your home should be a backdrop for your life, ready to adapt as you grow and change. A bespoke design provides a timeless foundation that allows for this evolution. It’s not about creating a static, museum-like space. Instead, it’s about designing a comfortable and flexible environment that can accommodate new memories, art, and experiences. Henderson believes in adding small, happy surprises throughout a home, those little details that continue to delight you years later. A thoughtfully designed space serves as a calm, personal sanctuary that grows with you, making it feel like home no matter what chapter of life you’re in.
Finding Your Daily Dose of Design Inspiration
Inspiration isn’t something you can force, but you can create the conditions for it to find you. Following Shawn Henderson’s philosophy means shifting your focus from what’s trendy to what’s meaningful to you. True design inspiration comes from your own life—the places you’ve traveled, the art that moves you, and the stories you want to tell. It’s about noticing the details in your daily life that bring you joy. Think about the serene feeling of a quiet art gallery, the rich textures in your favorite coat, or the warm, inviting atmosphere of a local cafe. These personal connections are the building blocks of a home that feels authentic and alive, a principle we hold dear in our own design work.
A great way to start is by becoming a collector of inspiration. Create a digital or physical mood board where you can gather images, fabric swatches, and color palettes that resonate with you. Don’t limit yourself to interiors; pull from fashion, nature, and photography. The goal isn’t to copy a specific look but to identify a feeling or an aesthetic that you’re drawn to. This collection becomes a visual diary of your taste, a powerful tool that helps clarify your vision. When you have this foundation, you can start to see patterns and themes emerge, giving you a clear direction for your space and making the design process feel much more intuitive.
This is where a collaborative design process becomes so valuable. Your collection of personal inspiration is the perfect starting point for a conversation with a designer. At Freddie Ramon, our client-centered approach is built on this exact idea. We partner with you to dive into your mood board and your stories, helping to translate those abstract feelings and ideas into a cohesive, sophisticated design plan. We believe that the most luxurious spaces are the ones that reflect a client’s unique vision, blending your personal narrative with our expertise in craftsmanship to create a home that is truly and completely yours.
Our Favorite Luxury Interior Design Blogs
While your personal story is the most important source of inspiration, seeing how world-class designers and architects bring their ideas to life can be incredibly motivating. Following a few high-quality design blogs is a great way to stay informed about new materials, innovative layouts, and timeless aesthetics. To get you started, here are a few of our team’s go-to sources for sophisticated design inspiration:
- Architectural Digest: The definitive source for seeing inside the world’s most beautiful homes. It’s perfect for understanding how high-end design comes together in a finished, polished space.
- Yellowtrace: This online magazine offers a highly curated look at interior design, art, and architecture. It’s a fantastic resource for finding inspiration that feels artistic and ahead of the curve.
- Dezeen: If you’re drawn to modern and contemporary design, Dezeen is essential. It showcases cutting-edge projects from around the globe, offering a glimpse into the future of architecture and interiors.
Related Articles
Frequently Asked Questions
What is the main idea behind Shawn Henderson’s design philosophy? At its core, his philosophy is about creating a true partnership with the client. He believes a home should be a direct reflection of the people living in it, telling their personal story through carefully chosen art, furniture, and objects. It’s less about imposing a specific look and more about drawing out your unique personality to create a space that feels authentic and deeply personal.
Is Shawn Henderson’s style only suitable for minimalist spaces? Not at all. While he often uses calm, neutral color palettes to create a serene foundation, his work is known for its incredible depth and character. He masterfully balances this tranquility with moments of drama, using bold art, sculptural furniture, or surprising pops of color. The goal is a sophisticated and soulful space that feels both peaceful and full of life, not empty or stark.
How can I apply his principles without starting a major renovation? You can start small by focusing on personal storytelling. Begin curating objects that have meaning to you, like a piece of art from a trip or a vintage find that catches your eye. Another simple but effective step is to experiment with your furniture layout. Moving pieces around can completely change a room’s energy and function, helping you see your space in a new light.
Why is there such an emphasis on custom furniture in his work? Custom pieces are essential to his approach because they ensure every element in a room is perfectly suited to the space and the client’s lifestyle. Off-the-shelf furniture can’t always meet the specific scale or functional needs of a room. Custom design allows for a level of personalization and quality craftsmanship that results in a cohesive, one-of-a-kind environment where every detail feels intentional.
What does a “client-centered” design process actually look like? It’s a collaborative dialogue from start to finish. A designer using this approach won’t just show up with a finished plan. Instead, they will spend time getting to know you, your tastes, and how you live. The design evolves from those conversations, blending your vision with the designer’s expertise. The final result isn’t just the designer’s work or the client’s ideas, but a true fusion of both.