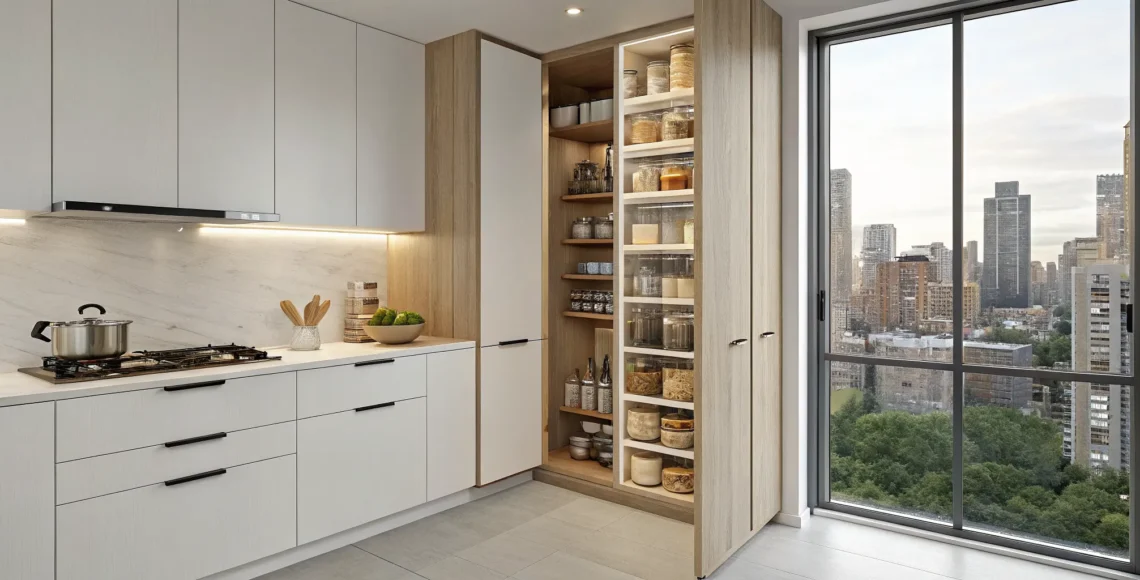
Small Pantry Design: A Designer’s Secrets
A small pantry is more than a design challenge—it’s an opportunity to create a special, jewel-box space in your home. Too often, these areas become an afterthought, leading to frustration and clutter. With a strategic approach, your pantry can become a highlight of your kitchen, blending seamless function with sophisticated style. A successful small pantry design is the foundation. It allows you to maximize every inch, incorporate smart storage, and choose materials that reflect your home’s character. The result is a space that’s both beautiful and incredibly practical.
Key Takeaways
- Design for Your Daily Life: Before choosing a single container, map out your pantry. Measure the space, consider your cooking habits, and inventory your items to create a functional foundation that makes your routine easier.
- Think Vertically and Inward: Make the most of a small footprint by using its full height with adjustable shelves. Solve the problem of deep, hard-to-reach corners by installing pull-out drawers and sliders that bring everything into view.
- Organize with Style and Intention: Create a cohesive and beautiful space by grouping similar items into zones, using clear containers with simple labels, and selecting high-quality materials and lighting that match your kitchen’s aesthetic.
How to Plan Your Small Pantry Layout
A beautifully organized pantry doesn’t happen by accident; it’s the result of thoughtful, meticulous planning. Before you get carried away with custom shelving or elegant containers, taking the time to map out your layout is the most critical step you can take. A well-designed plan ensures every inch of your small space is both highly functional and visually stunning, tailored perfectly to your lifestyle. This is where true luxury design begins, transforming a simple storage area into a seamless and sophisticated extension of your kitchen. A pantry that works is one that was designed with intention from the very start.
By focusing on three key areas, you can create a solid foundation for a pantry that feels spacious, intuitive, and effortlessly chic. First, you’ll need to accurately measure your space to understand its potential and limitations. Next, you’ll consider your daily workflow to ensure the layout supports your habits, making everyday tasks feel easier. Finally, you’ll define your specific storage needs to select the right solutions for every single item you own. Let’s walk through how to approach each of these essential planning stages to create a pantry you’ll love using.
Grab Your Tape Measure
The first rule of any design project is to know your canvas. Grab a tape measure and get the precise dimensions of your pantry: height, width, and depth. Don’t forget to note the location of any existing features like light switches or outlets that might influence your design. Once you have your numbers, sketching a simple floor plan can be incredibly helpful. This visual guide will prevent you from buying shelves that are too deep or containers that won’t fit. It allows you to experiment with different layouts on paper, helping you visualize the flow and make informed decisions before committing to a final design. This foundational step ensures every element you introduce will fit perfectly.
How Do You Use Your Kitchen?
A pantry should work for you, not against you. Think about how you move through your kitchen and what you reach for most often. Do you bake frequently? Your flour, sugar, and mixing bowls should be easily accessible. Are you always making smoothies? Perhaps a dedicated station with an outlet for your blender makes sense. The most successful pantry designs prioritize function. Good pantry lighting is also essential, ensuring you can always see what you have, even in the back corners. By planning for your daily habits, you create a space that feels intuitive and makes your daily routines smoother and more enjoyable.
Take a Pantry Inventory
Take an inventory of what you need to store. Are you buying in bulk, or do you prefer smaller quantities? Do you have a collection of spices, oils, or small appliances that need a home? Answering these questions helps you determine the right mix of storage solutions. You might need deep shelves for large cereal boxes, pull-out drawers for bags of snacks, and narrow racks for spices. Using a variety of containers, like clear airtight canisters for dry goods and woven baskets for produce, can keep things organized and visually appealing. Planning your storage this way ensures every item has a designated, logical place.
Smart Storage Solutions to Maximize Space
A well-designed pantry isn’t about how much space you have, but how you use it. With a thoughtful approach, even the most compact pantry can become a model of efficiency and elegance. The key is to implement smart storage solutions that work together to create a seamless, organized system. By thinking creatively about every drawer, shelf, and empty wall, you can design a space that feels both functional and luxurious, making it easy to find exactly what you need, right when you need it.
Go Vertical with Adjustable Shelves
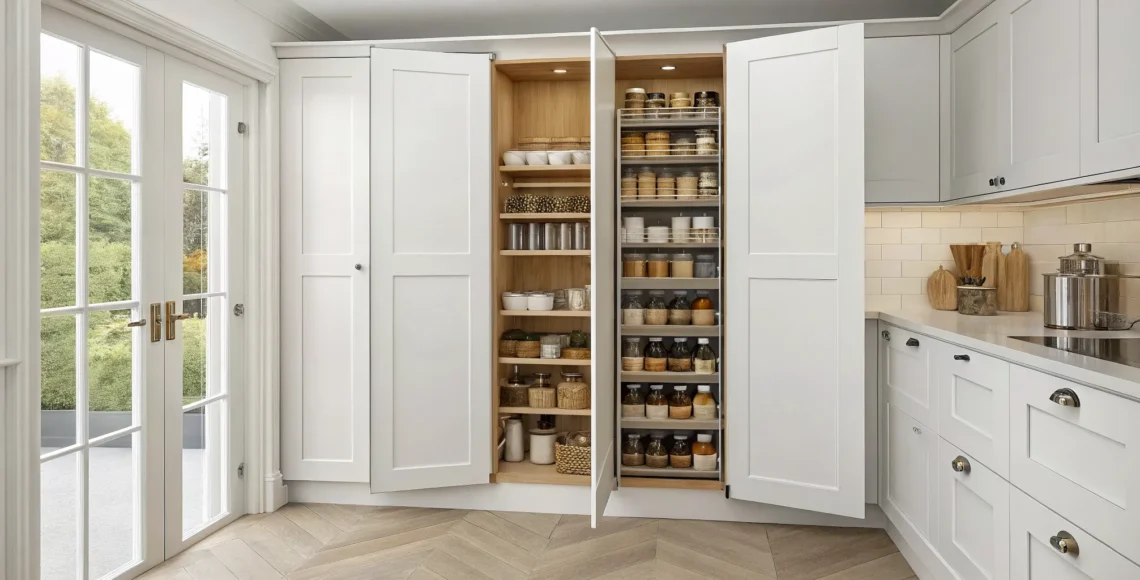
One of the best ways to increase your pantry’s capacity is to look up. Using vertical space is a game-changer, especially in smaller closets or nooks. Instead of standard, fixed shelves, consider a custom system with adjustable shelving. This gives you the flexibility to store everything from tall cereal boxes and olive oil bottles to short cans and spice jars without wasting precious inches. A floor-to-ceiling shelving unit not only maximizes storage but also creates a clean, built-in look that feels intentional and high-end. By tailoring the shelf height to your specific items, you ensure every bit of space serves a purpose.
Make Everything Accessible with Pull-Outs
Deep pantry shelves can quickly become a frustrating black hole where items get lost and forgotten. Installing pull-out drawers and sliding shelves completely solves this problem. These mechanisms bring the back of the shelf to you, giving you a clear view and easy access to everything you own. Imagine smoothly gliding out a drawer filled with snacks or a sliding rack holding all your cooking oils and vinegars. For tricky corner pantries, a Lazy Susan or a custom pull-out system can make that awkward space fully functional. These thoughtful additions are a hallmark of custom pantry design and make daily kitchen tasks feel effortless.
See Everything with Clear Containers
For a pantry that is as beautiful as it is functional, trade mismatched packaging for a cohesive set of clear containers. Decanting dry goods like pasta, grains, flour, and cereal into airtight, transparent containers has multiple benefits. First, it helps you see exactly what you have at a glance, which prevents you from buying duplicates and reduces food waste. Second, it keeps your food fresher for longer. Finally, the uniform look creates a sense of calm and order that instantly elevates the space. Grouping these containers in labeled bins or baskets adds another layer of organization, making your pantry feel like a curated boutique.
Don’t Forget Your Doors and Walls
Don’t let any surface go to waste. The back of your pantry door and any open wall space are prime real estate for extra storage. An over-the-door rack is perfect for holding spices, jars, and other small items that can clutter up your main shelves. You can also install shallow shelves or ledges on a free wall to line up cans or display your favorite cookbooks. These wall-mounted organizers are brilliant for grabbing frequently used items quickly. By using these often-overlooked areas, you can free up valuable shelf space for bulkier products and keep your pantry feeling open and uncluttered.
Rethink Your Pantry Door
If your pantry has bifold doors, you’re missing out on a significant storage opportunity. These doors fold in on themselves, making their back surfaces unusable. By simply replacing them with a standard swinging door, you instantly create a new, functional surface. This allows you to add slim spice racks, organizers for foils and wraps, or even a small message board for grocery lists. It’s a straightforward change that transforms a purely structural element into an active part of your storage system. This kind of thoughtful detail is what turns a standard pantry into a meticulously planned space where every component serves a distinct and useful purpose.
Consider a Space-Saving Door Style
In kitchens where every inch counts, the swing of a traditional door can create an awkward obstruction. A sliding barn door is an excellent alternative that addresses this issue with style. Because it glides along a track parallel to the wall, it requires zero floor space to open, making it ideal for tight corners or narrow hallways. Beyond its practical benefits, a barn door can also serve as a beautiful design feature, adding texture and character that complements your kitchen’s aesthetic. This choice not only solves a spatial problem but also introduces a custom, high-end feel, proving that functional solutions can also be the most visually appealing.
Install a Peg or Hanging Rail
For a touch of timeless utility, consider adding a peg rail or a simple hanging rod to an open wall inside your pantry. This classic storage solution is incredibly versatile and keeps frequently used items visible and within easy reach. You can install a rail to hang aprons, cutting boards with leather straps, kitchen towels, or mesh bags filled with onions and garlic. This method not only frees up shelf and drawer space but also adds a layer of warmth and personality to the pantry. It creates an organized, lived-in look that feels both charming and incredibly practical, turning a simple wall into a hub of activity.
Use Shelf Risers and Can Dispensers
To prevent items from getting lost in the back of your shelves, think in layers. Simple shelf risers are a brilliant way to create tiers, giving you a clear view of everything from canned goods to jars of sauce. It’s like creating stadium seating for your pantry staples, so you’ll never have to blindly reach behind a row of beans again. For canned goods specifically, you can use a dispenser that stacks them vertically and feeds them forward as you take one. This not only saves a surprising amount of shelf space but also helps you rotate your stock naturally. These small additions bring a huge amount of order and make it much easier to see what you have at a glance.
Incorporate Rolling Bins for Heavy Items
Storing heavy, bulky items like bags of potatoes, onions, or even pet food on the floor can feel messy and make them difficult to access. A fantastic solution is to use rolling bins. These containers, often made from wood or wire, are fitted with small wheels that allow you to effortlessly slide them out when you need something. This approach keeps heavy items neatly contained and off the floor, making your pantry easier to clean. It’s a perfect example of how a practical storage choice can also add a touch of rustic charm or industrial chic, depending on the material you choose. This is an especially great idea for families with kids, as it makes it easy for them to grab their own snacks.
Keep a Step Stool Handy for High Shelves
When you’re making use of every vertical inch, you need a safe and easy way to reach the top shelves. Keeping a step stool inside or near the pantry is essential. Forget the clunky, industrial-looking ones; there are many stylish and compact options available that can complement your kitchen’s design. Look for a slim, foldable stool that can be tucked away in a narrow space between a cabinet and the wall, or even hung on a hook. Choosing a well-designed step stool in a material like wood or painted metal means you won’t mind having it visible, turning a purely functional item into a thoughtful part of your kitchen’s decor.
A Simple System for Pantry Organization
A beautifully designed pantry is only as good as its organization. Once your layout and storage solutions are in place, the final step is to arrange everything for maximum efficiency and ease. A thoughtfully organized pantry streamlines your cooking process, reduces food waste, and brings a sense of calm to your kitchen. The goal is to create a system so intuitive that you can find what you need without a second thought. This isn’t just about tidiness; it’s about designing a space that supports your daily life with grace and simplicity. By implementing a few key strategies, you can transform your pantry into a perfectly functional and accessible part of your home.
Group Like Items Together
Start by taking everything out of your pantry and sorting it into logical categories. Think about how you cook and live. Common groupings include baking supplies, breakfast items, pasta and grains, canned goods, snacks, and oils and vinegars. Once you have your piles, use clear containers, bins, or baskets to keep each category together. This approach makes it easy to see what you have at a glance, preventing you from buying duplicates. It also makes grabbing what you need for a specific meal much faster. For example, you can pull out a single “baking” bin instead of searching for flour, sugar, and vanilla extract separately.
Set Up Your Pantry Zones
Take your categories a step further by creating dedicated zones within your pantry. This is where you can truly customize the space to fit your lifestyle. If you start every morning with a latte, set up a cozy coffee station with your machine, beans, mugs, and syrups all in one place. If you have kids, create a snack zone on a lower, accessible shelf where they can grab their own treats. You can also establish zones for weeknight dinner staples or special occasion ingredients. Thinking in zones helps you design a pantry that feels less like a storage closet and more like an extension of your kitchen.
Put Everyday Items Within Reach
Arrangement is everything when it comes to accessibility. Keep the items you use most frequently at eye level and within easy reach. This might include daily cooking oils, your favorite spices, or go-to breakfast foods. Less-used items, like bulk supplies or specialty appliances, can go on the highest or lowest shelves. Heavier items, such as bags of flour or large jars, should always be stored on lower shelves for safety. This simple hierarchy saves you time and frustration, ensuring your most-needed ingredients are always right where you expect them to be.
The Power of a Good Label
Labels are the finishing touch that makes your organizational system last. After you’ve decanted dry goods into clear containers and sorted items into bins, add a clean, simple label to everything. This not only helps you identify items quickly but also ensures everyone in the household knows where things belong. You can choose a labeling style that matches your kitchen’s aesthetic, from modern printed labels to elegant handwritten ones. A consistent labeling system is a small detail that makes a significant impact, maintaining order and adding a polished, custom feel to your pantry.
Common Small Pantry Design Mistakes to Avoid
Designing a small pantry is an exciting project, but a few common missteps can turn a dream space into a daily frustration. Knowing what to watch out for from the start helps ensure your pantry is as functional as it is beautiful. By sidestepping these frequent design errors, you can create a pantry that works seamlessly with your lifestyle and enhances your kitchen’s overall design. Let’s walk through the key mistakes to avoid so your pantry becomes a highlight of your home, not a headache.
Giving Your Items Room to Breathe
It’s easy to think that more space is always better, but that’s not the case with pantries. A pantry that’s too deep can become a black hole where items get lost and forgotten. On the other hand, one that’s too small won’t hold what you need. The key is finding the right balance. Aim for a depth that allows you to see everything at a glance, preventing food from expiring in the back. Thoughtful pantry organization is about creating accessible, visible storage, not just cramming as much as possible into one area.
Why Your Shelving Choice Matters
One of the most common mistakes is failing to plan your shelf sizes carefully. Standard shelving might not accommodate your specific needs, leaving you with wasted space or items that just don’t fit. Before you install anything, take inventory of what you store. Measure your tallest cereal boxes, widest appliances, and largest jars. This information allows you to create a custom shelving solution with varied heights and depths, ensuring every inch of your pantry is put to good use and every item has a designated home.
Don’t Get Left in the Dark
A dark, shadowy pantry makes finding what you need a frustrating task. Lighting should never be an afterthought; it’s a fundamental part of a functional design. Plan for good lighting from the very beginning to ensure the entire space is well-lit. Integrated LED strip lighting under shelves can illuminate items from front to back, while a stylish ceiling fixture adds a touch of elegance. Proper kitchen lighting not only improves visibility but also makes the space feel more inviting and cohesive with the rest of your kitchen.
Keeping Your Kitchen Flow Smooth
Where you place your pantry is just as important as what’s inside it. A poorly positioned pantry can seriously disrupt your kitchen’s workflow. Placing it directly within the main work area, often called the kitchen work triangle between the sink, stove, and refrigerator, can create a bottleneck. This forces you to walk around the pantry door while you’re cooking, making the process feel clumsy and inefficient. Instead, position your pantry just outside this primary zone for easy access that doesn’t interfere with your movement.
Inspiring Layouts for Small Pantries
A small pantry doesn’t have to feel like a compromise. With a thoughtful layout, even the most compact space can become a powerhouse of organization and style. The key is to move beyond standard shelving and think about how the pantry’s structure can serve your kitchen’s unique flow and your family’s needs. A smart pantry design maximizes every inch, transforming your kitchen into a more efficient and enjoyable space. From clever corner solutions to multi-functional nooks, the right layout can make all the difference.
Let’s explore some creative approaches that blend form and function, proving that a small pantry can be just as luxurious and practical as a large one. These ideas are designed to inspire a custom solution that feels seamlessly integrated into your home.
Making the Most of a Corner
Unused corners are often the most underutilized areas in a kitchen. A corner pantry is a brilliant way to claim that space and turn it into deep, accessible storage. These designs are perfect for tucking away bulk items or small appliances that you don’t use every day. To make everything easy to reach, we can incorporate custom solutions like Lazy Susans or curved shelving that bring items from the back to the front with a simple spin.
An L-shaped layout is another fantastic option, especially for slightly larger nooks. By running shelving along two adjacent walls, you create an open, walk-in feel without sacrificing storage capacity. This design keeps everything visible and within arm’s reach, preventing items from getting lost in the back. It’s an elegant solution that makes the most of every available inch.
The Efficient Galley-Style Pantry
If your pantry is more of a narrow closet, a galley layout is your best friend. This design features two parallel walls of shelving, creating a streamlined and highly efficient corridor of storage. The secret to making a galley pantry work is to think vertically. By installing floor-to-ceiling shelving, you draw the eye upward and use the full height of the room.
We can maximize storage capacity with a combination of deep shelves for bulk goods at the bottom and shallower shelves for everyday items at eye level. Pull-out drawers and baskets are also essential in a galley layout, as they allow you to access everything stored in the back without having to unload the entire shelf. This approach keeps your pantry organized and makes finding what you need effortless.
Have a Nook? You Have a Pantry
Sometimes the best place for a pantry isn’t obvious. A nearby coat closet or an awkward architectural nook can be transformed into a beautiful and functional storage space. The idea of a perfect pantry is different for everyone, and a custom conversion allows us to create something that is perfectly tailored to you. This approach is ideal for homes where kitchen space is at a premium.
By repurposing an existing closet, you can gain a surprising amount of storage without undertaking a major renovation. We can design custom shelving, add stylish lighting, and select a door that complements your kitchen’s aesthetic. This turns a forgotten space into a deliberate and sophisticated design feature that adds both character and convenience to your home.
The Pantry That Does It All
Your pantry can be more than just a place to store food. With a little creativity, even a small pantry can become a multi-purpose hub that makes your kitchen run more smoothly. Imagine a dedicated station for your coffee maker and espresso machine, complete with mugs and supplies, freeing up valuable counter space. Or consider a hidden charging station for phones and tablets to keep your main kitchen counters clear of clutter.
For those who love to bake, we can even incorporate a small countertop made of marble or butcher block for rolling out dough. Adding a workspace turns your pantry into a true extension of your kitchen. It’s a luxurious touch that enhances organization and creates a seamless, stress-free cooking experience.
Integrate Appliances to Save Kitchen Space
A pantry can also serve as a clever appliance garage, helping you maintain a clean, uncluttered look on your main kitchen counters. By adding a small countertop inside your pantry, you can create a dedicated home for items like your coffee maker, toaster, or blender, keeping them accessible but out of sight. Imagine a beautifully organized coffee station with narrow shelves for your favorite mugs and supplies, all tucked away. This thoughtful design choice not only frees up valuable workspace in your kitchen but also contributes to a more serene and streamlined aesthetic, making your daily routines feel more intentional and less chaotic.
Design a Dedicated Pet Feeding Station
For many of us, pets are part of the family, but their bowls and food bags can create clutter in the kitchen. A custom pantry design offers the perfect solution: a dedicated feeding station. By incorporating a low shelf or a pull-out drawer for food and water bowls, you can keep them off the floor and out of high-traffic areas. This not only makes your kitchen safer and tidier but also contains any spills. We can even design built-in storage for pet food right above the station, creating a seamless and organized system that considers every member of your household.
Small Pantry, Big Luxury
A small pantry doesn’t mean you have to compromise on style. Think of it as an opportunity to create a jewel-box space that feels intentional and sophisticated. Designing a luxury pantry is less about size and more about thoughtful details, premium materials, and a seamless integration with your kitchen’s aesthetic. It’s about transforming a purely functional closet into a beautifully crafted feature of your home. By focusing on quality over quantity, you can create a small pantry that is both incredibly practical and a joy to use every day.
It’s All in the Finishes
The materials you choose set the tone for your entire pantry. Swapping standard wire shelving for custom-built wood cabinetry in walnut or white oak instantly adds warmth and character. Consider a small countertop slab of marble or quartzite for a durable and elegant surface to place items on. As design experts note, a pantry should support your daily routines, not just follow fleeting trends. We partner with you to select timeless and premium materials that not only look stunning but are also built to last, ensuring your pantry is a functional and beautiful space for years to come.
Add Character with Wallpaper or Paint
A small pantry is the perfect place to make a bold design statement without overwhelming your kitchen. Think of it as a hidden gem waiting to be discovered. Applying a vibrant wallpaper or a deep, moody paint color can instantly give the space a unique personality and a touch of unexpected delight. Because the area is contained, you can experiment with patterns and shades that might feel too daring for a larger room. For those who prefer flexibility, peel-and-stick wallpaper offers a beautiful, low-commitment way to add charm and character, turning a simple closet into a thoughtfully curated feature.
Incorporate Custom Millwork like Beadboard
To give your pantry a truly custom and sophisticated feel, consider incorporating custom millwork. Details like beadboard paneling or elegant trim work add texture and architectural interest, transforming a standard closet into a bespoke space. This type of craftsmanship introduces a sense of history and permanence, whether you’re aiming for a classic, cottage-inspired look or a clean, modern aesthetic. It’s a subtle detail that speaks volumes about quality and attention to detail, ensuring the pantry feels like a seamless and intentional extension of your kitchen’s design rather than a separate, utilitarian afterthought.
Choose Stylish and Durable Flooring
The pantry floor is a detail that shouldn’t be overlooked. While continuing your kitchen’s flooring into the pantry creates a cohesive flow, choosing a different material can define the pantry as its own distinct space. A beautiful patterned tile or a classic checkerboard design can add a touch of personality from the ground up. Since the pantry is a high-traffic area, it’s important to select a material that is not only stylish but also durable and easy to clean. This thoughtful choice ensures your pantry is as practical as it is beautiful, blending function with high-end design.
Hang Curtains to Artfully Conceal Shelves
For a softer and more charming approach to concealing pantry shelves, consider hanging a custom curtain instead of a traditional door. This solution adds a layer of texture and color while artfully hiding any items you prefer not to have on constant display. A beautiful linen or patterned fabric can act as a design feature, complementing your kitchen’s decor and adding a touch of warmth. This is an especially great option for open-concept pantries or nooks, as it keeps the space feeling accessible and light while still maintaining a sense of order and tidiness.
Add Sophisticated Integrated Lighting
Proper lighting is essential in any pantry, but in a luxury design, it becomes a key feature. You should always “plan for good lighting from the beginning.” Instead of a single, harsh overhead bulb, a layered approach creates ambiance and improves functionality. We recommend combining recessed ceiling lights for overall brightness with integrated LED strips under each shelf. This ensures every corner is well-lit, making it easy to find exactly what you need. This thoughtful illumination not only makes the space more usable but also highlights the quality of your chosen materials and finishes.
Install Hands-Free Motion-Sensor Lighting
For a small detail that makes a huge difference in your daily routine, consider hands-free motion-sensor lighting. This simple upgrade adds a touch of modern luxury, instantly illuminating your pantry the moment you open the door. A poorly lit pantry is one of the most common pantry design mistakes, turning a simple task into a frustrating search. By installing lights that anticipate your needs, you can say goodbye to fumbling for a switch with your hands full. It’s a thoughtful, client-centered detail that makes every trip to the pantry feel seamless and effortless, supporting the natural flow of your life in the kitchen.
Incorporating motion-activated LED strips under your shelves ensures every corner is bright, making it easy to read labels and find exactly what you’re looking for. This isn’t just about practicality; it’s a sophisticated touch that contributes to a high-end, custom feel. Proper lighting is a key feature in any luxury design, transforming a simple storage area into a well-organized and enjoyable part of your kitchen. With this simple addition, you can easily see everything you have, which helps reduce food waste and makes your daily routines just a little bit smoother and more pleasant.
The Finishing Touches: Custom Details
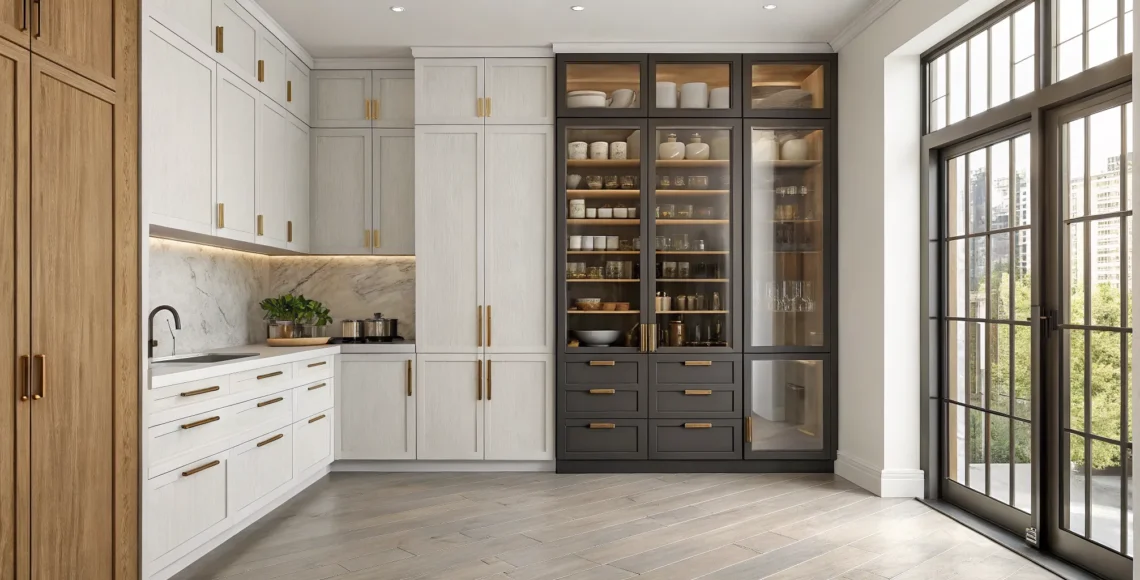
The final touches are what truly personalize a space and give it a high-end feel. As one expert puts it, “the idea of a perfect pantry is really a moving target because the term means different things to different people.” This is where custom details come in. Selecting unique cabinet hardware in finishes like unlacquered brass or polished nickel can tie the pantry’s design to the rest of your kitchen. We can also incorporate special features like leather-lined drawers for delicate items or a small, artfully tiled backsplash. These bespoke elements reflect your personal style and turn a simple storage area into a thoughtfully designed space.
What’s the Best Shelving for Your Pantry?
The right shelving is the backbone of a functional and beautiful pantry. It’s what transforms a simple closet into a highly organized, accessible space. Your choice will impact everything from how you store your groceries to the overall aesthetic of your kitchen. When planning your design, you’ll encounter a few key decisions. Thinking through how you’ll use the space will help you select a system that not only fits your pantry’s dimensions but also supports your daily life. Let’s walk through the main options to find the perfect fit for your home.
Adjustable or Fixed: Which Is Right for You?
The debate between adjustable and fixed shelving comes down to one thing: flexibility. Adjustable shelves give you the freedom to change your pantry layout as your needs evolve. Effective pantry layouts should easily accommodate everything from tall cereal boxes and bulk items to small spice jars and cans. With an adjustable system, you can move shelves up or down to minimize wasted vertical space and ensure every item has a perfect home. Fixed shelves, on the other hand, are built directly into the pantry structure. They offer incredible stability for heavy appliances or large containers but lack the versatility of their adjustable counterparts.
Wire vs. Solid: Pros and Cons
When it comes to shelf material, you’re typically choosing between wire and solid surfaces like wood or melamine. Wire shelving allows for better air circulation, which can be a plus for storing items like onions and potatoes. However, its open grid design can cause smaller items to tip over or fall through. A simple solution is to use clear liners to create a solid surface where needed, giving you the best of both worlds. Solid shelves provide a stable, flat surface that’s easy to wipe clean. They offer a more finished, high-end look and prevent any frustrating spills or wobbles.
Should You Go Custom or Modular?
For a truly seamless and luxurious pantry, nothing compares to custom built-ins. Working with a designer ensures your pantry is tailored specifically to your lifestyle and storage needs. A bespoke pantry design supports your daily routines with thoughtful details, rather than just following a passing trend. Custom solutions can integrate specialized drawers, vertical dividers for baking sheets, and wine racks. Modular systems offer a more standardized approach. While they can be effective, they often don’t utilize the space as efficiently as a custom build and may not provide the same level of craftsmanship or cohesive style that defines a luxury home.
Popular Design Styles for Small Pantries
Your pantry, no matter its size, is an opportunity to extend your kitchen’s personality. Choosing a distinct design style ensures this hardworking space feels intentional and cohesive, rather than like a forgotten closet. A well-designed pantry is a small luxury that makes daily life smoother and more beautiful. The key is to select a style that not only complements your kitchen but also supports your organizational needs. Whether you prefer clean, modern lines or a warm, rustic touch, a clear design direction will transform your pantry from a purely functional area into a thoughtfully curated feature of your home.
By focusing on specific materials, color palettes, and organizational tools that align with a chosen aesthetic, you can create a space that feels both personal and polished. This approach allows you to blend high-end finishes with practical solutions, proving that great design can happen in the most compact of spaces. Let’s look at a few popular styles that work exceptionally well for small pantries.
Sleek and Simple: The Modern Style
A modern and minimalist pantry is all about clean lines and an uncluttered feel, where the organization itself becomes the art. This style follows a “less is more” philosophy, focusing on high function and a sleek, seamless appearance. With smart planning, the goal is to prioritize how everything works and where it’s stored, allowing the aesthetic to emerge from that order. Think flat-panel custom cabinetry, integrated hardware, and a neutral color palette of crisp whites, deep grays, and blacks. Materials like metal, glass, and smooth laminates enhance the clean look, while uniform clear containers create a visually quiet and organized space.
Cozy and Charming: The Farmhouse Pantry
The farmhouse style brings a sense of warmth, history, and texture to your pantry. It’s perfect for creating a cozy and inviting atmosphere. This look celebrates natural materials, so consider using reclaimed wood for open shelving, shiplap for wall paneling, and woven baskets for storing produce or linens. If your kitchen lacks a built-in pantry, a freestanding storage piece like a vintage armoire can create a charming, custom feel. Details like oil-rubbed bronze hardware and classic label holders complete the look, making the space feel both practical and full of character.
Bright and Airy: Scandinavian Design
Inspired by Nordic principles, a Scandinavian design approach makes a small pantry feel bright, airy, and effortlessly functional. This style uses light colors, natural materials, and simplicity to create a serene and organized space. To make the area feel larger and more welcoming, opt for a palette of soft whites, light grays, or even a calming sage green for the walls and shelves. Light-toned woods like birch or pine are perfect for open shelving, keeping the space from feeling heavy. The focus is on functional, beautiful objects and maintaining a clutter-free environment that feels both peaceful and practical.
Earthy and Eclectic: The Boho Pantry
The Bohemian style transforms your pantry into a warm and inviting space that celebrates personality. This look is all about an eclectic mix of textures, colors, and patterns. Start by incorporating natural materials like reclaimed wood for shelving and wicker or seagrass for storage baskets. These elements add an earthy, tactile quality, with some designs even featuring elegant rattan doors that bring rustic charm. Don’t be afraid to mix vibrant patterns through decorative containers or a unique wallpaper. The goal is to create a curated look that feels personal, so display unique pieces like handmade pottery or vintage finds. This approach thrives on individuality, turning your pantry into a lively focal point that tells your story.
Calm and Collected: Neutral-Toned Design
For those who prefer a serene and orderly environment, a neutral-toned pantry is an ideal choice. This design promotes a sense of calm by sticking to a soft palette of whites, beiges, and grays, creating a clean and sophisticated backdrop. The focus is on a minimalist approach, using clear, uniform containers and simple labels to declutter and organize. A beautifully organized pantry streamlines your cooking process and brings a sense of calm to your kitchen. To complete the look, choose high-quality materials like wood or stone for shelving and countertops. These elements add a touch of quiet luxury, while integrated lighting enhances the serene atmosphere, making it easy to find what you need without overwhelming the senses.
Ready to Design? A Step-by-Step Plan
With a clear vision, you can transform even the smallest pantry into a functional and beautiful space. Breaking the design process down into a few key steps will help you create a plan that is both practical and perfectly tailored to your home. This simple framework ensures every detail is considered, from the basic layout to the finishing touches.
Put It on Paper: Your Floor Plan
When you’re working with a small pantry, function comes first. The key is to focus on how you’ll use the space before you think about aesthetics. A great way to start is by using the full height of your pantry instead of just its depth. This approach helps you see everything at a glance, so you won’t have to dig around for that one specific spice jar. A thoughtful floor plan is the foundation for a pantry that feels spacious and organized, helping you make the most out of tight spaces. Measure everything carefully, from wall to wall and floor to ceiling, to create a precise blueprint for your design.
Decide on Your Non-Negotiables
Once you have your layout, think about what you need to store. Take stock of your current pantry items and group them by how often you use them. Your daily essentials, like coffee, cereal, or cooking oils, should be in the most accessible spots, right at eye level or within easy reach. Less-used items can go on higher or lower shelves. This is where smart storage solutions come into play. Using clear containers, sliding shelves, and turntables can completely change how your pantry functions. These creative small kitchen pantry ideas make items easy to find and grab, keeping your workflow smooth and simple.
Design a Pantry That Grows with You
A truly luxurious design is one that adapts to your life over time. As you plan your pantry, think about how your needs might change. The best modern pantry layouts are efficient and flexible, often incorporating adjustable shelving that can be reconfigured as needed. Looking ahead, you might also consider integrating smart technology to help track inventory or using beautiful, sustainable containers that are both eco-friendly and stylish. By designing a pantry that is easy to modify, you create a space that will serve you well for years to come, blending timeless form with forward-thinking function.
Related Articles
Frequently Asked Questions
I feel overwhelmed by the clutter. What’s the single most important first step to take? Before you think about containers or shelving, the best first step is to take everything out. It sounds like a big task, but it’s the only way to get an honest look at the space you have and what you truly need to store. This process gives you a clean slate, allowing you to sort, categorize, and plan with intention rather than trying to organize around existing clutter.
Is it better to have open shelving or closed cabinetry in a small pantry? This really depends on your personal style and organizational habits. Open shelving can make a small space feel more airy and keeps everything you need in plain sight, which is great if you enjoy the look of uniform containers. Closed cabinetry, on the other hand, is perfect for creating a clean, seamless appearance by hiding visual clutter. A custom design can even blend both, giving you a perfect balance of display and concealed storage.
My pantry is an awkward shape, not a simple closet. How can I make it functional? Awkwardly shaped spaces are often the most rewarding to design because they require creative, custom solutions. For a deep corner, a Lazy Susan or a pull-out shelving system can make every item completely accessible. For a narrow nook, focusing on vertical storage with floor-to-ceiling shelves makes the most of the room’s height. The key is to view the unique shape as an opportunity for a tailored design, not as a limitation.
Are custom built-ins really worth the investment for such a small space? Absolutely. In a small space, every inch is valuable, and custom built-ins are the best way to ensure none of it is wasted. Unlike modular systems, a custom design is tailored precisely to your items and your daily routines. It allows for varied shelf heights, integrated drawers, and solutions for tricky corners that off-the-shelf products simply can’t match. It’s an investment in perfect function and a seamless, high-end finish.
How can I make my pantry feel like a cohesive part of my kitchen design? Think of your pantry as a small extension of your kitchen, not just a separate closet. You can create a cohesive feel by carrying over key materials and finishes from your main kitchen space. Use the same style of hardware you have on your kitchen cabinets, consider using a countertop remnant for a small work surface, or paint the interior in a complementary color. These thoughtful details are what tie the two spaces together beautifully.