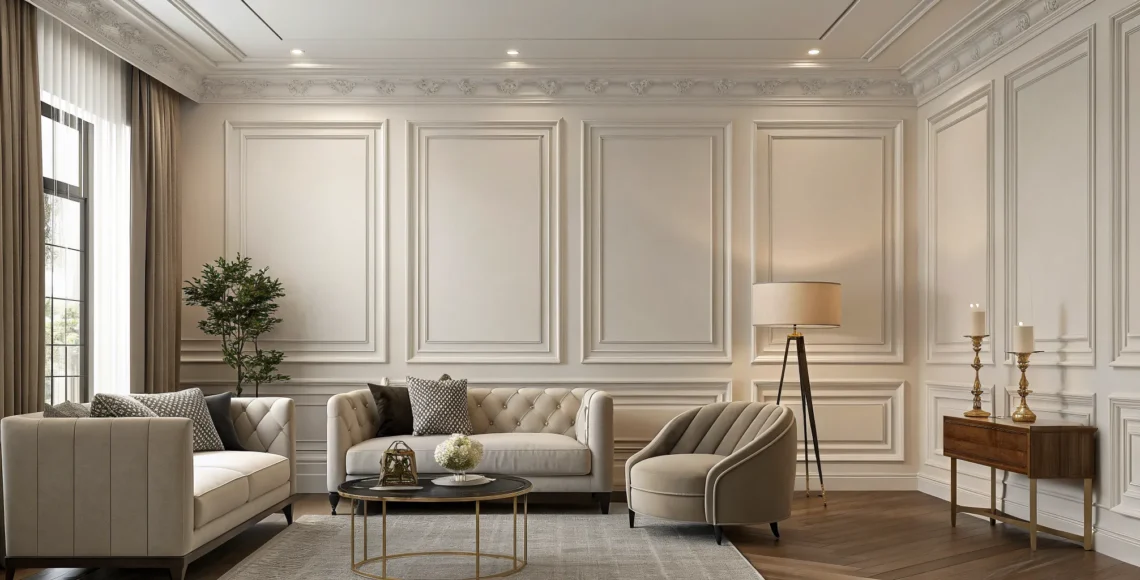
Chic Living Room Wall Molding Ideas for a Custom Look
Creating a home that feels truly personal and luxurious is all about the details. While we spend a lot of time choosing the right sofa or rug, the walls themselves offer a huge opportunity to make a statement. Wall molding adds architectural detail and structure to a living room. From simple panels to intricate designs, molding enhances visual interest while maintaining balance. It works across both modern and traditional interiors. If you’re ready to move beyond a simple accent wall, these living room wall molding ideas will provide the inspiration you need to create a truly memorable space.
Key Takeaways
- Select a style that fits your home’s character: Wall molding is a powerful tool for adding architectural interest, so choose a design that complements your space. Use classic crown molding to make ceilings feel taller, wainscoting to add texture and structure, or picture frame molding to create a sophisticated focal point.
- Match the scale and material to your room: The most effective molding is proportional to the space, so opt for more substantial trim in rooms with high ceilings and simpler profiles in smaller areas. Your material choice also matters; consider classic wood for warmth, MDF for a smooth paint finish, or durable polyurethane for high-moisture rooms like bathrooms.
- Define the mood with color and finish: Your paint choices can completely transform the final look. Create a timeless, high-contrast design by painting trim a crisp white against a colored wall, or go for a dramatic, modern feel by painting the molding and walls the same shade for a cohesive, color-drenched effect.
What is Wall Molding? (And How It Redefines a Room)
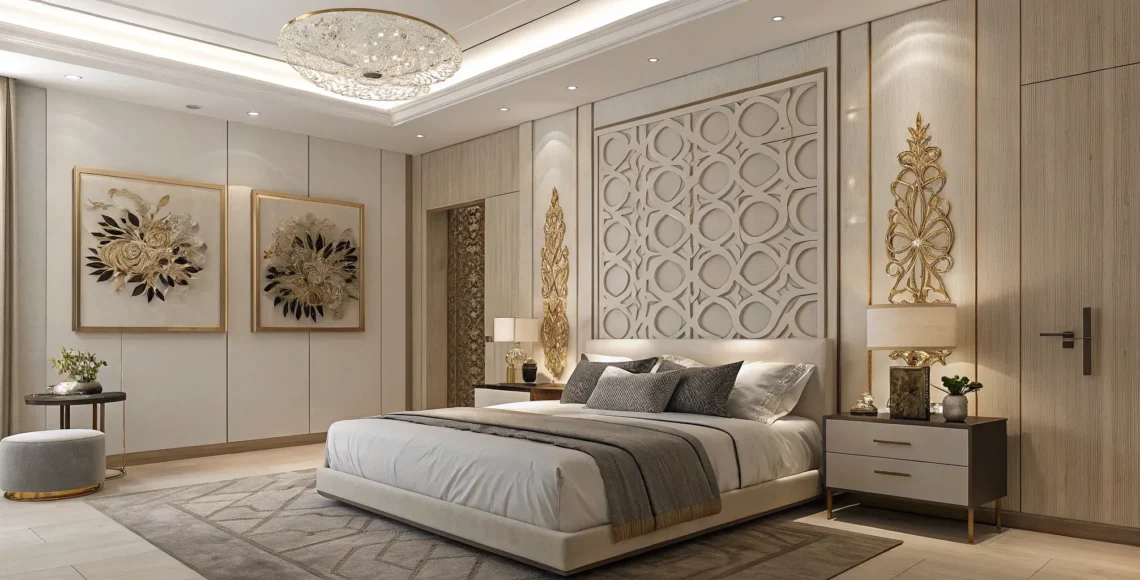
Have you ever walked into a room and felt an immediate sense of elegance and structure? Chances are, wall molding was responsible for that feeling. Simply put, wall molding is a decorative trim applied to your walls to add architectural interest. It’s a design detail that can completely transform the look and feel of a space, turning a plain wall into a sophisticated canvas. From simple chair rails to intricate picture frame designs, molding introduces texture, shadow, and a sense of history that paint alone can’t replicate.
At its core, molding is about adding character. It’s a technique that adds depth and showcases attention to detail, making a room feel more finished and custom. Think of it as the finishing touch that pulls an entire design together, guiding the eye and creating subtle focal points. This small addition can make ceilings feel higher, rooms feel grander, and the entire home feel more cohesive and thoughtfully designed. It’s a testament to craftsmanship that elevates your space from standard to stunning.
Many designers now favor wall molding over painted accent walls because it offers a more permanent and integrated look. While a pop of color can be fun, architectural details provide a timeless appeal that becomes part of the room’s foundation. Whether you’re aiming for a classic, traditional aesthetic or a clean, modern vibe, there’s a molding style that fits. It’s the perfect way to create a truly custom environment that reflects your personal style and speaks to a higher level of design sophistication.
Achieve a Timeless Look with Crown Molding
Crown molding is one of those architectural details that instantly signals quality and intention in a home’s design. This classic trim, which runs along the top of a wall where it meets the ceiling, does more than just look beautiful. It creates a graceful transition between the two surfaces, drawing the eye upward and making a room feel taller and more expansive. Think of it as the finishing touch that pulls a whole room together, giving it a polished, custom-built feel.
What I love most about crown molding is its incredible versatility. It’s not just for formal, traditional homes with soaring ceilings. With the right profile and finish, it can bring a sense of refined elegance to almost any space, from a historic Las Vegas estate to a sleek, modern condo. Whether you want to add a layer of historical character or introduce a subtle architectural accent, crown molding provides a framework that enhances your entire design. It’s a timeless element that works beautifully with a wide range of styles, proving that some details truly never go out of fashion.
Explore Traditional Styles
In a traditional setting, crown molding is all about adding grandeur and intricate detail. It’s the perfect way to honor classic architectural principles and give your living room a sense of history and permanence. Ornate profiles with curves, steps, and decorative elements can transform a simple room into an elegant space. This type of molding is especially effective at concealing any small gaps where walls meet the ceiling, providing a crisp, clean line that looks incredibly polished. It’s a detail that feels both decorative and purposeful, adding a layer of sophistication that defines classic interior design.
Use Crown Molding in Modern Spaces
You might think crown molding feels out of place in a modern home, but it can be a stunning addition when done right. The key is to choose simpler, more streamlined profiles. Think clean lines, subtle curves, or even a straight, flat trim that adds definition without the fuss. In contemporary interiors, crown molding creates a seamless transition that adds a touch of elegance where the walls meet the ceiling. For a cohesive and inviting look, try matching the thickness of your crown molding to your baseboards. This simple trick creates a beautiful visual frame around the room, making the entire space feel thoughtfully designed and complete.
Add Character and Depth with Wainscoting
If you’re looking for a way to give your walls a truly custom, architectural feel, wainscoting is a fantastic option. Simply put, wainscoting is a type of decorative paneling applied to the lower portion of a wall. It was originally used to protect walls from scuffs and dings in high-traffic areas, but today, its primary role is aesthetic. It adds a layer of texture, dimension, and sophistication that paint or wallpaper alone just can’t replicate.
Wainscoting instantly makes a room feel more complete and thoughtfully designed. It breaks up large, plain walls, creating visual interest and a sense of structure. While it’s often associated with traditional homes, there are many different wainscoting styles that can complement any interior, from classic and formal to rustic and modern. By choosing the right style and finish, you can create a look that feels both timeless and perfectly suited to your personal taste. It’s a powerful tool for transforming a simple room into an elegant, polished space.
Traditional Panel Wainscoting
For a look that exudes classic elegance, traditional panel wainscoting is the perfect choice. This style typically covers the bottom third of the wall and features a series of square or rectangular panels. These can be raised, flat, or recessed, creating a beautiful interplay of light and shadow. While it was first designed to protect walls, it now serves to add a classic aesthetic to any room. It’s a wonderful way to bring a sense of formality and grandeur to spaces like dining rooms, entryways, and home offices. Paired with crown molding, it creates a cohesive and sophisticated architectural statement that never goes out of style.
Board and Batten Wainscoting
Board and batten is an incredibly versatile style that can lean rustic, modern, or somewhere in between. It’s created using wide, flat boards spaced apart with narrow wood strips, called battens, covering the seams. This design forms a clean, geometric pattern that adds texture without feeling overly ornate. The spacing of the battens can dramatically change the look; wider spacing feels more traditional, while tighter spacing creates a more contemporary vibe. It’s a popular choice for adding character to hallways, bedrooms, and family rooms, bringing a relaxed yet structured feel to the space.
Beadboard Wainscoting
Beadboard wainscoting offers a charming and timeless appeal with its signature vertical grooves. This style consists of long, continuous panels that create a clean, linear texture, which can help make a room feel taller. Beadboard is known for its versatility and can fit seamlessly into many different design schemes, from a cozy, cottage-inspired bathroom to a crisp, modern laundry room. It’s a wonderful way to add texture and visual interest to your walls. While often painted classic white for a fresh look, beadboard also looks stunning in a bold, saturated color for a more dramatic and contemporary statement.
Create a Statement Wall with Picture Frame Molding
If you want to create a dramatic focal point in your living room, picture frame molding is a fantastic choice. Also known as box molding or wall paneling, this technique uses thin strips of trim to create decorative frames directly on the wall. It’s an incredibly versatile design element that adds architectural interest and a sense of bespoke luxury to any space. Whether your style leans toward classic elegance or bold contemporary design, you can adapt this technique to fit your vision.
Picture frame molding is perfect for breaking up large, empty walls, adding texture, and creating a custom backdrop for furniture and decor. It can make a room feel more polished and complete, turning a plain wall into a deliberate and thoughtful design feature. From simple, elegant rectangles to intricate geometric patterns, the possibilities are truly endless. Let’s look at a few ways you can use this technique to make a statement.
Design with Single Frames
The most classic application of picture frame molding involves creating large, single frames on the wall. Think of elegant rectangles, often arranged in a series of two or three, that bring a sense of symmetry and old-world charm to a room. This approach is perfect for adding a layer of sophistication without overwhelming the space. It provides a subtle architectural detail that feels both timeless and refined.
You can use these frames to highlight specific features in your living room. A beautifully crafted frame can serve as a sophisticated border for a cherished piece of art, a statement mirror, or even a wall-mounted television, integrating it more seamlessly into your decor. This method not only draws the eye but also gives your most-loved pieces a place of honor. It’s a simple way to add character and a custom touch to your walls.
Arrange Multiple Frame Layouts
For a more dynamic and layered look, consider arranging multiple frames in a thoughtful layout. This approach allows for more creativity and can be tailored to the specific scale and style of your room. You might opt for a classic grid of identical squares for a traditional feel or a more varied arrangement of different-sized rectangles for a transitional look. The key is to create a rhythm and pattern that feels balanced and intentional.
This is also where you can get creative with color and finish. Painting the molding a bright, contrasting color makes a bold and confident statement. For a more subtle effect, you can choose a paint finish like a high-gloss for the trim while keeping the wall in a matte or eggshell of the same color. This creates a beautiful, tone-on-tone texture that catches the light and adds quiet sophistication.
Apply Geometric Patterns
If your style is more modern, you can use trim to create striking geometric patterns that turn your wall into a work of art. Move beyond traditional squares and rectangles and think about sharp diagonal lines, interlocking shapes, or an abstract composition. This innovative approach is perfect for anyone wanting to make a unique and contemporary statement. It adds movement, energy, and a strong graphic element to your living room.
A geometric accent wall can serve as the primary focal point, reducing the need for additional wall decor. It’s a powerful way to express your personal style and create a space that feels truly one-of-a-kind. Whether you opt for a complex, intricate design or a simple, bold pattern, this technique ensures your living room will have a memorable and high-impact feature that reflects a modern design sensibility.
Try a Minimalist Approach with Modern Molding
If ornate, traditional molding doesn’t quite fit your vision, you’re in luck. Modern molding is all about adding architectural interest with a lighter touch. This style trades intricate curves for clean lines, subtle textures, and geometric simplicity, making it a perfect match for contemporary and transitional homes. It’s a sophisticated way to give your walls a custom, dimensional feel without overwhelming the space.
Instead of being a loud statement, modern molding acts as a quiet, structural detail that enhances the room’s overall design. It’s about creating depth and character through thoughtful, understated applications. Whether you’re aiming for a serene, spa-like atmosphere or a sharp, gallery-inspired look, this minimalist approach proves that sometimes, the most impactful designs are the most refined.
Focus on Clean Lines
The foundation of modern molding is its commitment to clean, simple lines. Think thin, flat-stock trim used to create geometric patterns or sleek, single-panel frames that add structure without fuss. This approach is less about decoration and more about defining space and creating a sense of calm and order. You can use simple profiles to outline a feature wall or create a subtle grid pattern that adds interest without visual clutter. The key is to maintain a crisp, uncluttered look that complements your minimalist furniture and decor, allowing the room’s architecture to speak for itself. This understated trim style is perfect for creating a polished backdrop in any modern living room.
Introduce Fluted Textures
To bring depth and a touch of organic warmth to a minimalist space, consider incorporating fluted or reeded molding. These vertical, textured panels create a stunning interplay of light and shadow, adding a three-dimensional quality to your walls. A fluted accent wall can become a sophisticated focal point behind a sofa or media console, providing texture that feels both modern and timeless. This technique is a fantastic way to introduce visual interest that doesn’t rely on color or pattern. The subtle rhythm of the fluted lines adds a layer of luxury and craftsmanship, turning a simple wall into a bespoke design feature.
Create Subtle Accents
A minimalist approach doesn’t mean your walls have to be boring. One of the most effective ways to use modern molding is to create subtle, tone-on-tone accents. Try painting your molding the exact same color as your walls but in a different finish. For example, pairing a matte wall with a satin or semi-gloss trim creates a gentle contrast that catches the light beautifully. This monochromatic painting technique gives the room a cohesive, designer-curated feel. It highlights the architectural details in a sophisticated, understated way, adding depth and dimension without breaking the minimalist color palette.
What’s the Best Material for Your Molding?
The material you choose for your wall molding is just as important as the design itself. It influences the final look, the long-term durability, and the overall budget for your project. While solid wood has long been the standard for its classic charm, today’s market offers some incredible modern alternatives that might be a better fit for your home and lifestyle. Each option has its own unique character and set of benefits, whether you’re aiming for the rich texture of natural wood or the crisp, clean lines of a composite material. Understanding these differences will help you and your designer make the perfect choice, ensuring your new molding looks beautiful for years to come.
Classic Wood
For a truly timeless and authentic feel, nothing quite compares to classic wood. Materials like poplar, pine, and oak bring a natural warmth and character to a room that is hard to replicate. The unique grain in each piece adds subtle texture and depth, whether you choose to stain it to highlight its natural beauty or paint it to match your color scheme. Wood is a fantastic choice for creating a high-end, traditional look that feels both grounded and sophisticated. Just keep in mind that solid wood can be more of an investment and may react to significant changes in humidity, so it’s best for stable, dry environments.
MDF and Composites
If you love the seamless look of painted molding, Medium-Density Fiberboard (MDF) and other composite materials are excellent options. MDF is an engineered wood product that creates a very smooth, stable, and consistent surface that’s perfect for painting. You won’t have to worry about knots or wood grain showing through your finish. For even greater durability, especially in areas that might see more traffic or moisture, HDHMR board (High-Density High Moisture-Resistant) is a top choice. These materials are generally more budget-friendly than solid wood and are less likely to warp or crack over time, giving you a flawless look that lasts.
Polyurethane and PVC
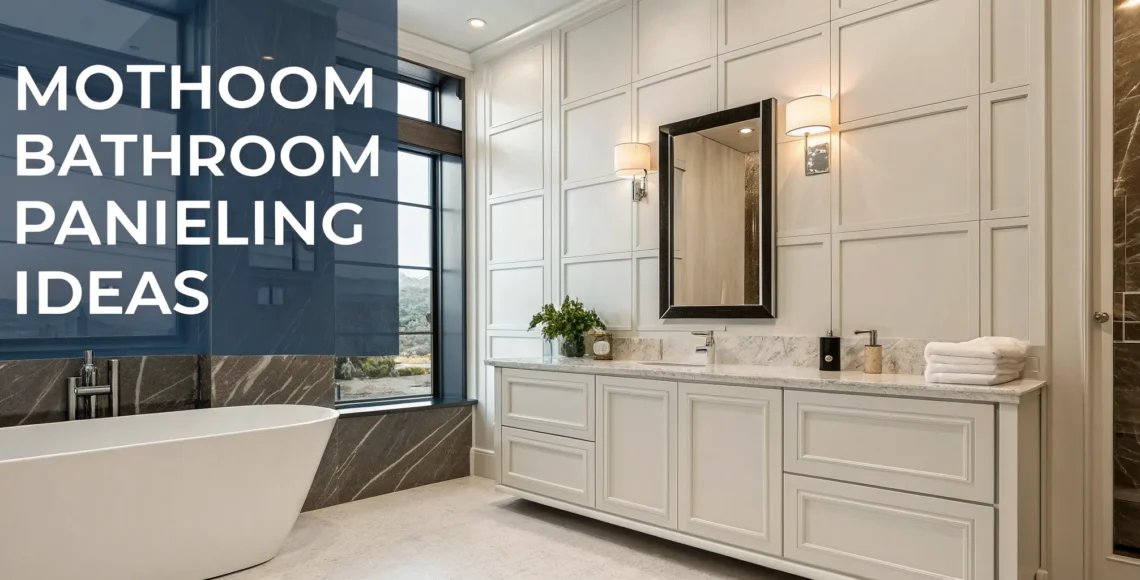
Modern materials like polyurethane and PVC offer some amazing advantages, especially when it comes to durability and intricate designs. High-density polyurethane is lightweight, yet it can hold incredibly sharp, detailed patterns that mimic the look of traditional plaster or custom-carved wood. Both polyurethane and PVC are completely waterproof and resistant to rot and insects, making them the ideal choice for bathrooms, kitchens, or homes in more humid climates. They often come pre-primed and are easy to cut and install, which can help streamline the installation process. These materials give you the freedom to get creative without worrying about maintenance.
How to Choose the Right Molding for Your Room
Selecting the right molding is one of those design decisions that can truly define a space. It’s more than just a decorative trim; it’s the finishing touch that ties everything together, creating a polished and intentional look. When done right, molding adds architectural interest and a sense of permanence to a room. But with so many styles, sizes, and materials available, how do you find the perfect fit?
The key is to think about molding as an integral part of your room’s design, not just an add-on. The best choice will feel like it has always been there, seamlessly blending with your home’s character while reflecting your personal style. To get it right, you’ll want to balance three main factors: the scale of your room, the architectural style of your home, and your overall project budget. By carefully considering each of these elements, you can select a molding that not only looks beautiful but also enhances the proportions and feel of your living room.
Consider Your Room’s Scale
The size of your molding should always be in proportion to the size of your room. This is especially true for ceiling height. A grand, ornate crown molding might look stunning in a showroom, but it can easily overwhelm a room with standard eight-foot ceilings, making it feel smaller and more crowded. As a general rule, the taller the ceiling, the more substantial the molding it can handle.
For rooms with high or vaulted ceilings, you can be more adventurous with wider, more detailed profiles. Wall molding is a decorative detail that can completely change how a room looks and feels, and in a large space, it adds necessary depth and visual weight. In smaller rooms or those with lower ceilings, opt for simpler, more delicate profiles that add character without closing in the space.
Complement Your Home’s Architecture
Your molding should honor your home’s existing architectural style. Think of it as a conversation with the rest of your house. If you live in a historic home, like a Tudor or Victorian, look for moldings with intricate details and classic profiles that reflect that era. For a mid-century or modern home, clean lines, simple geometric shapes, and minimal profiles will feel much more appropriate.
The goal is to create a cohesive look that feels authentic. When molding complements the architecture, it adds a classic touch that feels both timeless and intentional. If you’re unsure of your home’s style, take a look at original features like windows, doors, and fireplaces for clues. Choosing a molding that aligns with these details will ensure your new addition enhances your home’s character instead of clashing with it.
Plan Your Budget
While molding can create a high-end look, it doesn’t have to come with a high-end price tag. Wall moldings are a fantastic way to update your home decor and can transform a plain space into something special without a massive investment. The final cost will depend on two main things: the material you choose and the cost of installation.
Materials like solid wood are at the higher end, while options like MDF (Medium-Density Fiberboard) give a smooth finish and are quite durable and budget-friendly. The complexity of the design and the size of the room will also influence labor costs. It’s always a good idea to get a clear estimate for both materials and installation upfront to ensure your project stays on track financially.
Use Color and Finishes to Make an Impact
Once your molding is selected, the real transformation begins with color and finish. This is where you can infuse your personality into the room and create a specific mood. Think of your molding not just as a border, but as a key design element that can either blend in for a subtle, cohesive look or stand out to make a bold statement. The right paint choice can highlight the beautiful lines of your architecture, add visual height, and tie your entire design scheme together.
Beyond color, the finish you choose plays a critical role. A high-gloss finish will reflect light and draw attention to the molding’s intricate details, lending a formal, polished feel to the space. In contrast, a satin or matte finish offers a more modern, understated elegance that absorbs light and creates a soft, velvety look. The interplay between color and finish is a powerful tool for shaping the atmosphere of your living room, turning simple trim work into a defining feature of your custom-designed home. This is your opportunity to move beyond the standard and create something that feels uniquely yours.
Go Bold with Contrasting Colors
Creating contrast between your walls and molding is a classic technique for a reason: it works beautifully. A crisp white or off-white molding against a richly colored wall instantly makes the room’s architectural details stand out, creating a clean, defined, and timeless look. But you don’t have to stop there. For a more daring approach, you can flip the convention and use bright colors on the molding to create a bold contrast with your walls. Imagine a soft gray wall framed by molding painted in a deep charcoal or a vibrant navy. This choice adds an unexpected layer of personality and sophistication, turning your trim into a true design statement. The key is to select paint colors for trim that complement your overall palette while providing that eye-catching pop.
Try the Color Drenching Trend
If you’re aiming for a dramatic and immersive feel, consider the color drenching trend. This involves painting the molding, walls, and sometimes even the ceiling in the same deep, rich color. The result is a seamless, monochromatic look that wraps the room in a single, cohesive hue. This technique adds a lot of drama and style, making a space feel incredibly intentional and curated. It’s a fantastic way to make a large room feel more intimate and cozy or to give a smaller room a grand, jewel-box effect. By eliminating the visual breaks between surfaces, you create an uninterrupted backdrop that allows your furniture, art, and lighting to truly shine. This approach works especially well in monochromatic rooms designed to feel both modern and luxurious.
Experiment with Textured Finishes
Color isn’t the only way to make your molding impactful. Introducing texture is a sophisticated method for adding depth and interest to your walls. Instead of flat trim, you can utilize textured, vertical, and fluted panels for a modern and three-dimensional aesthetic. These types of wall paneling catch the light beautifully, creating subtle shadows and highlights that shift throughout the day. This adds a tactile quality to the room that feels both organic and highly designed. Fluted details, in particular, can elongate walls and add a sense of rhythm and movement. It’s a refined approach that elevates the entire space, proving that the most impactful designs often engage more than just the eye.
How to Handle Common Installation Challenges
Even the most beautiful molding design can fall flat without proper installation. While it might seem intimidating, tackling the project with careful planning and the right approach can make all the difference. Let’s walk through a few common challenges and how you can handle them to get that flawless, high-end finish you’re looking for.
Get the Right Tools and Materials
A great first step is to gather all your supplies before you begin. A successful installation depends on having the right equipment ready to go. You’ll want a quality tape measure, a saw for precise cuts (a miter saw is best for angles), a level, sandpaper for smooth edges, and your choice of nails or construction adhesive. Don’t forget your painting supplies for the finishing touches. Having all your installation tools organized and within reach streamlines the entire process, preventing frustrating interruptions and helping you achieve a clean, professional result that looks like it was done by an expert.
Decide: Should You DIY or Hire a Pro?
This is a key decision point. If you’re applying a simple chair rail in a small room, a DIY approach can be very rewarding. However, it’s important to be realistic about the scope of your project. For more complex geometric patterns, large rooms with high ceilings, or older homes with uneven walls, hiring an expert is often the best choice. When you’re investing in high-quality materials, a professional installer ensures every cut is perfect and every seam is invisible. This not only saves you valuable time and potential mistakes but also guarantees the final look lives up to your vision for the space.
Fix Uneven Walls and Measure Correctly
Precision is everything when it comes to molding. Before you make a single cut, map out your design directly on the wall with painter’s tape. This lets you visualize the layout, check proportions, and make adjustments easily. When you’re ready to install, use a level for every single piece to ensure it’s perfectly straight, as walls themselves are rarely perfect. For the most secure attachment, it’s smart to use both a strong contractor adhesive and finishing nails. The glue provides consistent hold, while the nails offer immediate support, which is especially helpful since you won’t always be able to find a wall stud exactly where you need one.
Pulling It All Together: How to Style Your New Molding
Once your beautiful new molding is installed, the final step is styling the room to make it shine. The right furniture placement, lighting, and a little upkeep will ensure your architectural details remain the star of the show. After all, molding isn’t just an addition to a room; it’s the framework that enhances everything within it. By thoughtfully considering how your decor interacts with these new lines and shadows, you can create a truly cohesive and polished space. Here’s how to bring everything together for a look that feels both intentional and effortlessly elegant.
Factor in Lighting
Lighting is your molding’s best friend. The way light hits the ridges and curves of your trim creates the beautiful shadows and highlights that give it dimension. A well-thought-out layered lighting plan can completely transform your room. Consider how natural light interacts with the walls throughout the day. Then, add artificial sources like sconces to graze the walls and accentuate picture frame molding, or a stunning chandelier to draw the eye up to your crown molding. Good lighting ensures your molding enhances everything around it, making furniture, art, and mirrors look even better.
Arrange Your Furniture
When placing furniture, think of your molding as the room’s built-in art. You want to complement it, not hide it. Arrange your pieces to create a cohesive look that respects the room’s architectural details. For example, center a sofa between two vertical panels of board and batten or place a console table within a large picture frame box. Your living room is the perfect place to make a statement, as it’s the most frequented room in the house. By aligning your furniture arrangement with your molding, you create a sense of balance and intention that feels incredibly sophisticated.
Keep It Looking Great
To maintain the crisp, elegant look of your new molding, a little routine care goes a long way. Dust it regularly with a soft microfiber cloth to keep grime from building up in the crevices, which can dull the finish. For a deeper clean, especially on baseboards or chair rails, simply use a soft cloth dampened with mild soap and water. Gently wipe the surfaces down, then follow with a dry cloth. This simple cleaning routine is all it takes to keep your molding looking pristine and protect your investment for years to come.
Frequently Asked Questions
Will adding molding make my room feel smaller or dated? Not at all, as long as it’s chosen thoughtfully. The key is to match the molding’s scale to your room’s proportions. For instance, a delicate trim can actually make a room with standard ceilings feel taller and more refined. Modern molding styles, which focus on clean lines and simple geometric shapes, feel fresh and current, proving that this architectural detail is truly timeless when applied correctly.
How do I choose a molding style if my home is new or doesn’t have a distinct architectural character? This is a great opportunity to define your home’s character yourself. Instead of trying to match a historical style, focus on the feeling you want to create. For a calm and sophisticated look, you might choose simple, flat-stock trim to create subtle frames on the wall. If you want something more relaxed yet structured, board and batten wainscoting is incredibly versatile. A new home is a blank canvas, so you can select a style that complements your furniture and personal taste.
What’s the most important factor to consider: the material, the style, or the color? Think of them as three parts of a whole, as they all work together to create the final look. Your home’s architecture and your personal taste will guide the style. The room’s function (like a bathroom versus a living room) will help determine the best material. Finally, the color and finish are what bring the design to life, setting the mood. A successful project balances all three elements to create a cohesive and intentional design.
Can I use molding in a room with low ceilings? Absolutely. The trick is to be strategic with your choices. Instead of a wide, heavy crown molding, opt for a slimmer profile that won’t feel overbearing. You could also focus on vertical details, like beadboard wainscoting or thin, floor-to-ceiling fluted panels, which draw the eye upward and create an illusion of height. These techniques add character and architectural interest without making the space feel closed in.
Is it better to paint the molding the same color as the wall or a contrasting color? This depends entirely on the effect you want to achieve. Painting your molding a crisp white against a colored wall creates a classic, defined look that highlights the room’s architecture. For a more modern and dramatic statement, painting the molding, walls, and even the ceiling the same color (a technique called color drenching) creates a seamless, immersive feeling. Both are beautiful options; it just comes down to your personal style.